Planning Your Camp
A successful STEM camp depends on decisions made well before students arrive. Confirm the adult host, location, equipment, schedule, registration process, advertising plan, family communication, food, and check-in procedures before promoting the camp. Families need accurate information when they sign up, and organizers need enough advertising time to fill the available spaces.
This guide describes what worked for our camp, but it is not a fixed program that must be followed exactly. Adapt the activities, schedule, enrollment, supplies, food, facilities, and procedures to fit your students, budget, available equipment, school requirements, and volunteer team. It is better to run a smaller or simpler camp well than to copy a plan your site cannot support.
The sections below are arranged in the order an organizer will generally need them. Start at the top during early planning and work downward toward camp day. Some tasks will overlap, but do not advertise details that have not yet been approved or confirmed.
Find a School Employee to Host With You
If the primary student host is still in high school, find a suitable school employee who can help host the camp. A teacher, librarian, engineering teacher, activities director, or another approved staff member can help reserve facilities, communicate with school administrators, understand district requirements, and make sure an authorized adult is present.
Choose someone who supports the purpose of the camp and can remain involved throughout planning and all camp sessions. Discuss responsibilities early, including:
- Who will reserve and unlock the building
- Who will request school or district approval
- Who will be the adult contact for families
- Who will supervise each room and activity
- Who can access school equipment
- Who will respond if a student is injured or needs help
- Who will remain until every student has been signed out
Do not advertise dates or locations until the staff host and school administration have confirmed that the camp can use the space.
Establish Facilities and Equipment
A library or engineering classroom works well as the main camp room. The site should also provide access to an outdoor grassy area for bottle rockets and a long hallway for paper airplanes and wind-powered cars.
Before advertising, confirm access to:
- A library, engineering classroom, computer lab, or similar main room
- Enough computers for the planned enrollment
- A projector or classroom display
- Tables, chairs, outlets, and extension cords where permitted
- A long hallway with a flat floor
- A large outdoor grassy area
- A hose or nearby water source for bottle rockets
- Restrooms and drinking water
- A place for lunch and food distribution
- A secure area for supplies
- Building keys, alarm procedures, and the correct entrance
- Summer heating, ventilation, and air-conditioning access
- Trash bins, recycling bins, replacement liners, and a waste-removal plan
- Reliable internet access and any required website permissions
Walk through the site with the school employee before registration opens. Test the computers, projector, internet, fan, launcher location, hallway measurements, and outdoor access. Confirm which doors families should use and what directions they will need after entering.
Temperature control and waste removal require special attention during summer. A school’s normal heating, ventilation, and air-conditioning schedule may be reduced or disabled when regular classes are not in session. Confirm that the occupied rooms will be cooled during setup, camp hours, lunch, and pickup, and identify an employee who can adjust the system if the room becomes uncomfortable.
Normal custodial trash and recycling collection may also be reduced or stopped during summer. Ask who will empty the bins, where full bags should be taken, and whether recycling will actually be collected. Bring extra liners and assign someone to remove food waste, activity scraps, and recycling after each session rather than assuming it will be collected automatically.
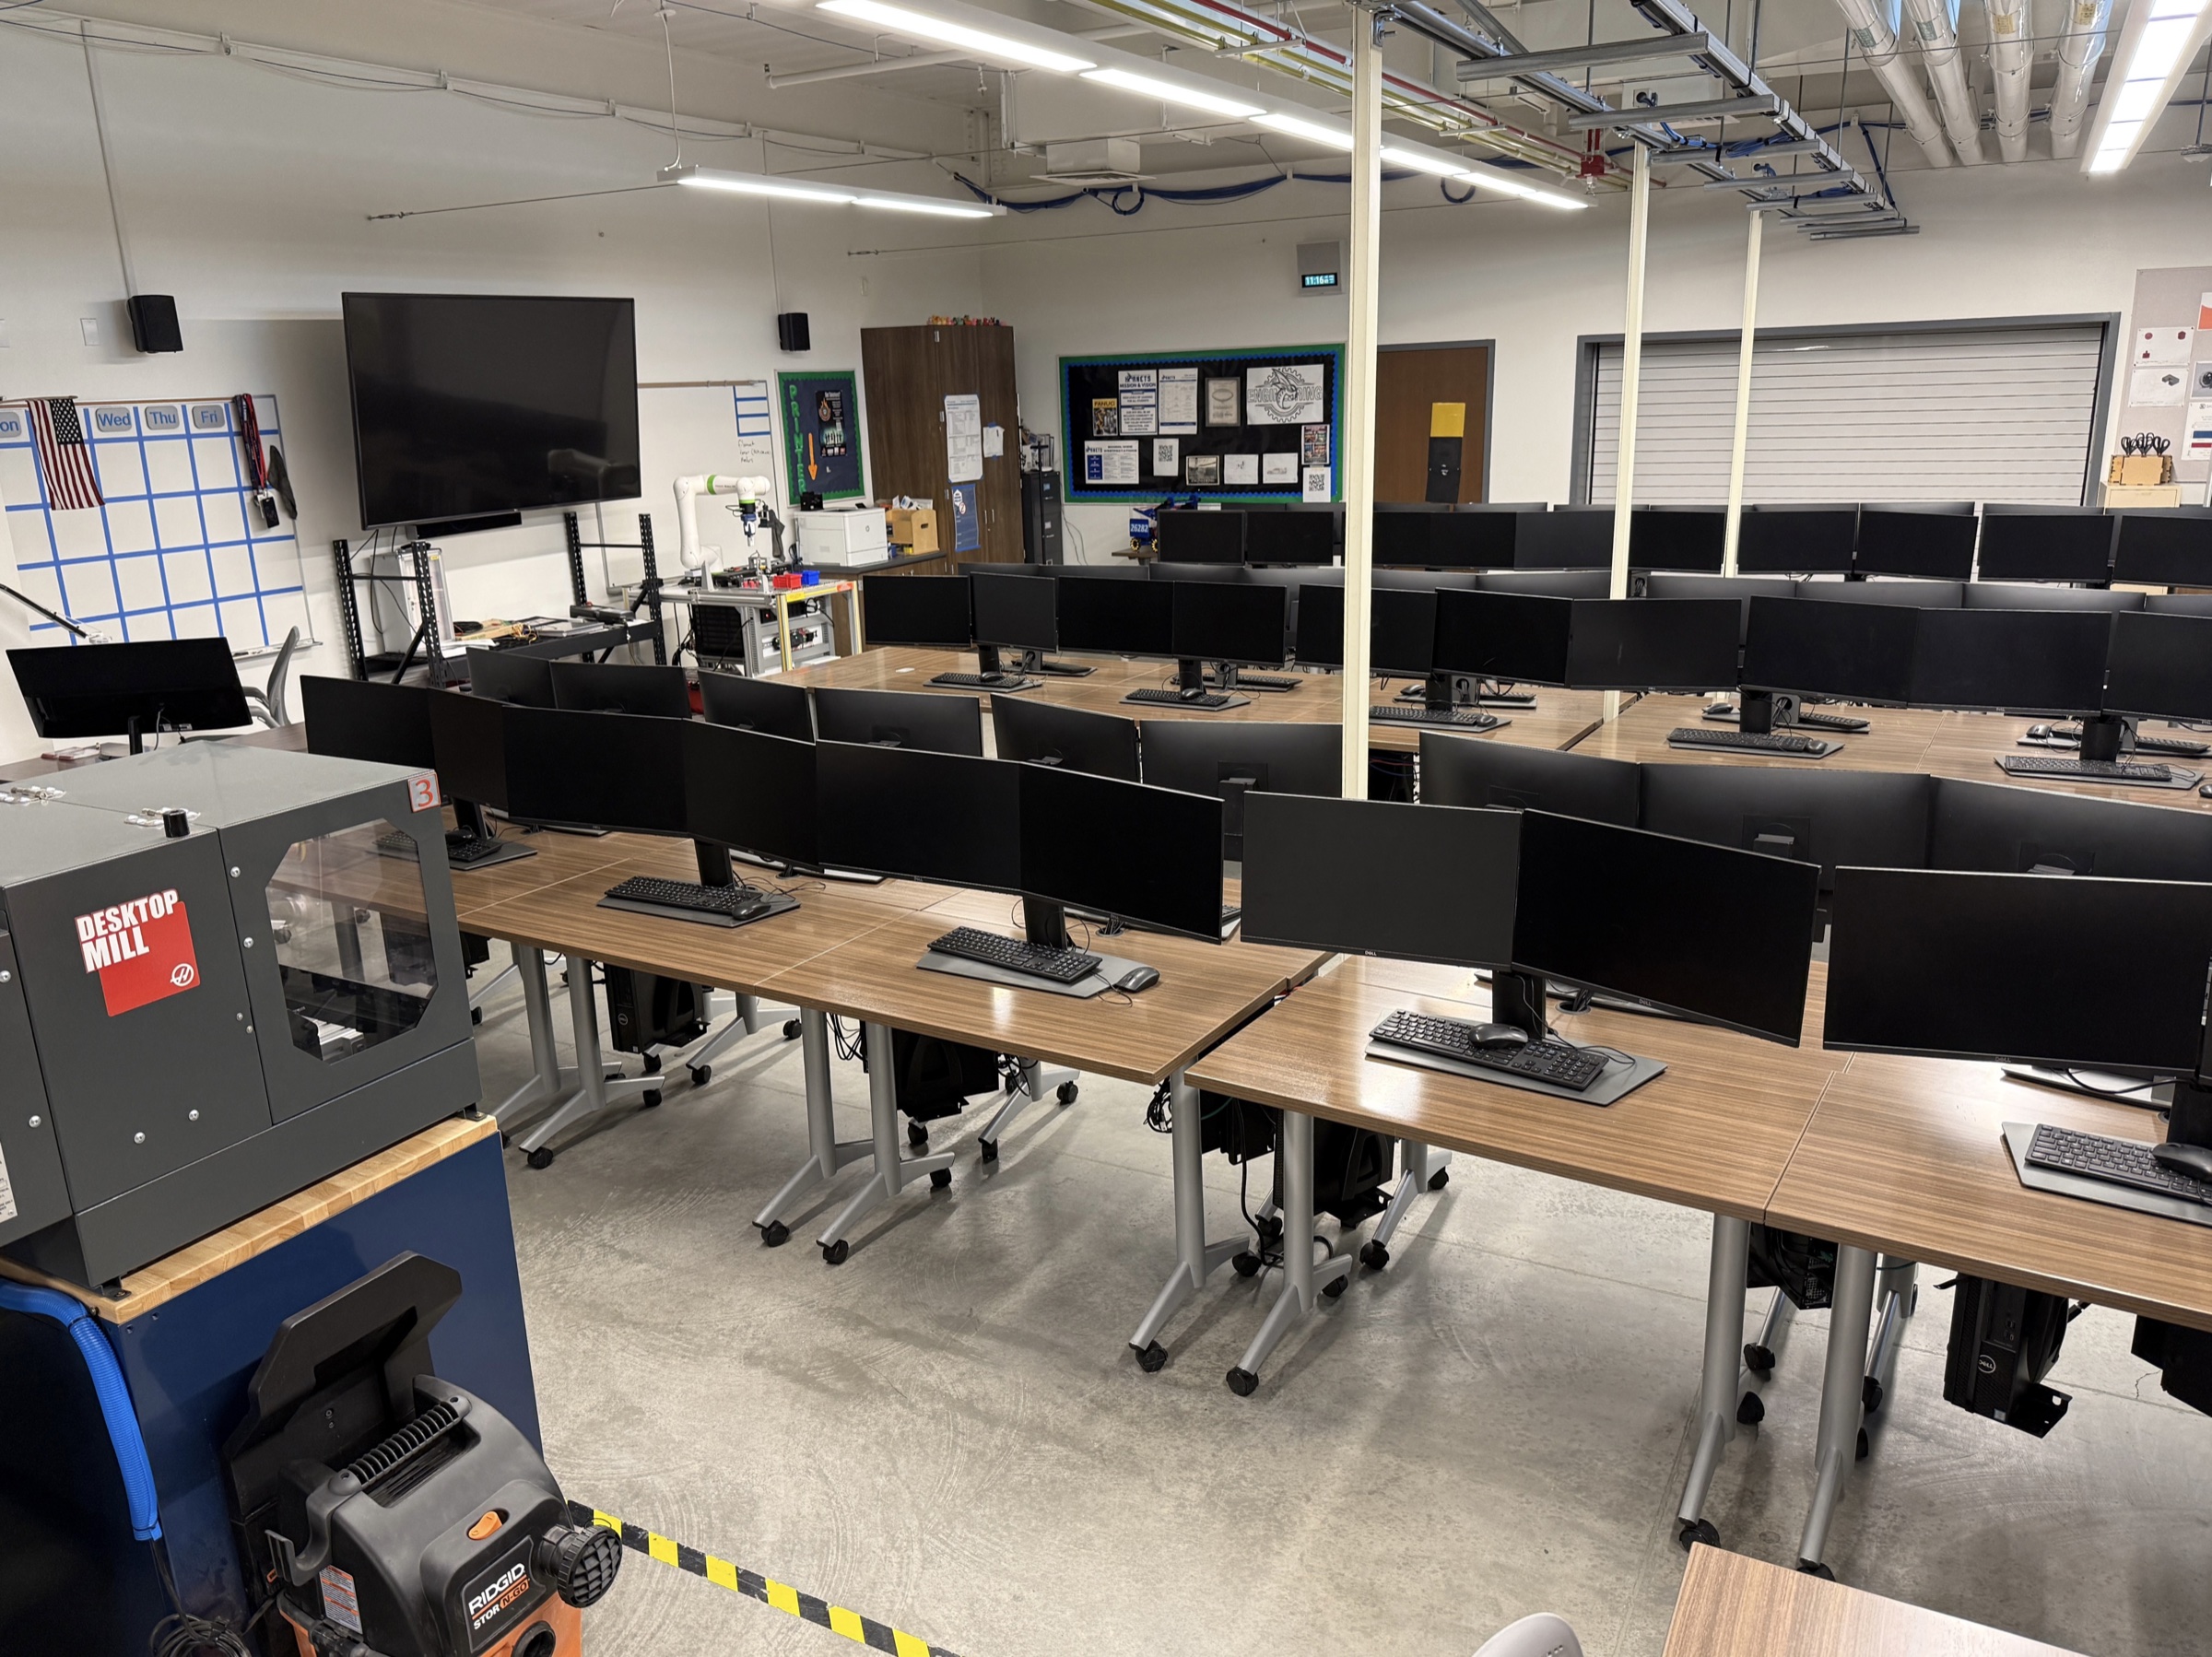
A computer and engineering classroom prepared for camp. Confirm that the computers, projection system, tables, chairs, and walking paths are ready before students arrive.
Establish the facilities, dates, times, capacity, equipment, and adult supervision well before the camp begins. Advertising cannot be accurate until these details are settled, and families need time to plan.
Estimate Cost and Available Resources
The totals below can look expensive or daunting, especially for a first-time organizer. Do not treat this budget as a required shopping list. You do not need to recreate our camp exactly to run a successful program. A smaller camp, fewer activities, simpler projects, or a schedule built around equipment already available can still give students an excellent experience.
Before buying equipment, reach out to teachers, librarians, school departments, robotics teams, families, local businesses, makerspaces, and other community organizations. Ask what they can lend, donate, help fund, or help you use. Start with the people and resources around you, then adapt the camp to fit what is realistically available.
This camp is intended to be low cost, but it is not free to run. The true cost depends mainly on which reusable resources the school can provide. Computers, 3D printers, Makey Makey kits, and classroom tools are far more expensive than the materials students consume.
The estimates below are planning figures for 20 students completing every activity in this guide. They are based on package quantities and prices checked in August 2026, before sales tax and shipping. Retail prices change, so verify them again before ordering.
Resources the Host Site Should Provide
This guide assumes the school, library, engineering program, robotics team, or makerspace can provide:
- A room, tables, chairs, electricity, internet access, and a projector
- One computer for each student or pair, depending on the activity
- At least one functioning 3D printer and slicing software
- Shared scissors, rulers, pencils, colored pencils, crayons, and basic markers
- A soldering iron, heat tool, wire cutters, wire strippers, and eye protection when available
- Hot-glue guns and heat-resistant work surfaces
- A hose and access to an appropriate outdoor launch area
- Trash bins, recycling bins, and ordinary cleaning supplies
The budget treats the computers, printers, facilities, software, and volunteer labor as donated or school-provided resources. Purchasing those items solely for this camp would make the project dramatically more expensive and is not recommended.
Confirm every borrowed resource with the staff host. Summer access, consumable-supply rules, software restrictions, equipment supervision, temperature control, and waste collection may differ from normal classroom use.
Recurring Cost for 20 Students
These are the supplies consumed, sent home, or commonly replaced each time the full camp is offered. The ranges allow for package-size differences, spare parts, and local prices.
View the recurring cost breakdown
| Activity or expense | Estimated cost | What the estimate includes |
|---|---|---|
| Paper airplanes | $5-$10 | Printer paper, data sheets, paper clips, and a small share of painter’s tape. Pencils and tape measures are borrowed. |
| Paper circuits | $30-$45 | Twenty CR2032 batteries, LEDs, copper tape, cardstock, printing, and several spare components. |
| Tinkercad keychains | $10-$20 | PLA actually used by the keychains plus ball-chain key rings. If no filament is already open, purchasing a full 1-kilogram spool increases the initial checkout cost. |
| Vibrating Art Robots | $105-$135 | Twenty motors, 20 switched battery holders, 40 AA batteries, 60 take-home markers, cups, jumbo glue sticks, rubber bands, painter’s tape, heat-shrink tubing, paper rolls, solder, and printed observation sheets. |
| Makey Makey Instruments | $10-$20 | Cardstock, copper tape, and replacement clips or cables. The reusable Makey Makey boards are listed separately below. |
| Scratch Game and Scratch Animation | $0-$10 | Scratch is free. This allowance covers optional headphones or small classroom replacements when computers are already available. |
| Wind-Powered Cars | $10-$20 | Cardboard, paper, straws, craft sticks, painter’s tape, and replacement parts. Reusable wheel-and-axle sets are listed separately below. |
| Bottle Rockets | $15-$30 | Cups, tape, hot glue, paper, decoration supplies, and replacement bottles. The launcher and pump are listed separately below. |
| Printing, registration, signs, name tags, and cleanup | $25-$50 | Flyers, permission slips, activity sheets, name tags, directional signs, tape, trash liners, and other operating supplies. |
| Lunch and drinks | $65-$100 | A simple pizza lunch, juice boxes or water, plates, napkins, and reasonable dietary alternatives for students and helpers. |
| Recurring subtotal | $275-$440 | Assumes major equipment and ordinary classroom supplies are already available. |
| Contingency | $30-$55 | Approximately 10 to 15 percent for defective parts, price changes, extra students, and last-minute purchases. |
| Estimated recurring total | $305-$495 | Approximately $15-$25 per student, including lunch. |
Without lunch, the recurring estimate is approximately $240-$395, or $12-$20 per student. Do not remove the contingency simply to make the advertised cost look lower.
Reusable Equipment for a First Camp
The following purchases are not required every year. Borrow them whenever possible and store purchased equipment for future camps.
View the first-year equipment breakdown
| Reusable purchase | August 2026 planning price | Notes |
|---|---|---|
| Two wheel-and-axle sets | About $26 | The linked sets were $12.99 each. Two sets provide the 80 wheels and 40 axles listed for 20 individual material sets. |
| Box fan | About $22 | The linked 20-inch fan was $21.99. Any comparable borrowed box fan is acceptable. |
| Two 25-foot tape measures | $15-$25 | Used for the wind-car course and other hallway activities. |
| AquaPod launcher | About $45 | The linked launcher was $44.99. Confirm bottle and pump compatibility before purchasing. |
| Bicycle pump with gauge | $20-$35 | Omit this cost if the school can provide a compatible pump or controlled inflator. |
| Art Bot preparation tools | $40-$90 | Soldering iron, heat tool, wire tools, eye protection, and related setup items if the host site owns none of them. |
| Hot-glue station and other shared tools | $15-$30 | Glue gun, work mat, and small shared tools when they cannot be borrowed. |
| Reusable subtotal without Makey Makeys | $145-$230 | These items can support later camps and other school projects. |
Adding these purchases to the recurring budget produces a first-year estimate of approximately $450-$725, including lunch, when computers, 3D printers, and Makey Makeys are still borrowed.
Makey Makey Equipment Changes the Total
Makey Makey boards are the largest activity-specific equipment cost. Twenty students working in pairs require ten boards. The official Makey Makey Classic was $51.95 each in August 2026, so ten individual kits cost $519.50 before tax and shipping. The official classroom STEM Pack includes 12 boards and extra parts for $724.95.
If the host must buy ten individual Makey Makey kits in addition to the other reusable equipment, a realistic first-year total is approximately $970-$1,245, including lunch but before tax and shipping. Purchasing the 12-board classroom pack instead raises that estimate to approximately $1,175-$1,450.
Borrowing Makey Makeys from a school, library, robotics team, district technology department, or makerspace is the single most effective way to keep the camp affordable.
Price Check Behind the Estimate
The activity totals use the products and quantities described throughout this guide. At the August 2026 price check:
- Two 12-packs of the linked Art Bot motors cost $23.98 total.
- The linked 20-pack of switched battery holders cost $15.99.
- The linked heat-shrink kit cost $4.99.
- Two linked white paper rolls cost $17.98 total.
- A 48-pack of store-brand AA batteries cost about $14.97.
- A 50-pack of 18-ounce plastic cups cost about $3.98.
- Two linked wind-car wheel-and-axle sets cost $25.98 total.
- The linked box fan cost $21.99.
- The linked AquaPod launcher cost $44.99.
- One kilogram of Bambu Lab PLA Basic cost $19.99, although the keychains use only part of a spool.
- One official Makey Makey Classic kit cost $51.95.
These figures are a snapshot, not a promise of future prices. Build a purchase list from the actual number of enrolled students, check package quantities, include tax and shipping, and avoid buying a full package when the school already has enough usable material.
Keep receipts and record both the package price and the amount left after camp. Separating the amount purchased from the amount consumed will make next year’s budget much more accurate.
Create the Registration Form
Use a registration form to collect student and family information in one place. You can start with this example Sanger STEM Camp Google Form. The link creates a copy that can be customized for a different camp.
Include fields for:
- Student’s full name
- Student’s grade and school
- Parent or guardian name
- Parent or guardian email address
- Parent or guardian phone number
- Emergency contact information
- Sessions the student plans to attend
- Dietary restrictions
- Permission to use student photos in advertising
Collect only the information needed to operate the camp, and limit access to the form and response spreadsheet to the adults and organizers who need it.
Before opening the form, set a response limit that matches the number of students the facility, equipment, and volunteers can support. Also set a closure date that leaves enough time to confirm enrollment, purchase supplies, arrange food, and prepare attendance records.
Link responses to a Google Sheet before advertising. Add columns for enrollment status, permission slip, attendance, lunch preference, dietary notes, and sign-out. Test the full process with one sample response, then remove the sample data before registration opens.
Advertise the Camp
Begin advertising only after the location, dates, times, capacity, adult host, and registration form are confirmed. Give families enough time to register while leaving the organizers enough time after registration closes to prepare.
We distributed flyers during a district-wide robotics event attended by elementary-school students and their families. This worked well because the event already attracted students interested in STEM.
Hand flyers directly to parents and teachers. Teachers are especially useful contacts because they can distribute the information to students who may be interested, and families often view a recommendation from a teacher as more credible than an invitation from an unfamiliar high-school student.
Other useful advertising locations may include:
- Elementary-school classrooms and newsletters
- School libraries
- Robotics events and science nights
- Parent organizations
- District or school social media, with approval
- After-school programs
- Community centers and public libraries
Make sure the details on the flyer match the details in the registration form. Both should use the same camp dates, times, location, eligible grades, cost if any, lunch information, registration deadline, capacity, and contact information. Add a short registration URL or QR code to the flyer so families can easily open the form.
Example Camp Flyer
Use the example flyer as a starting point, then update every date, time, location, eligibility requirement, registration deadline, contact detail, and QR code for your own camp.
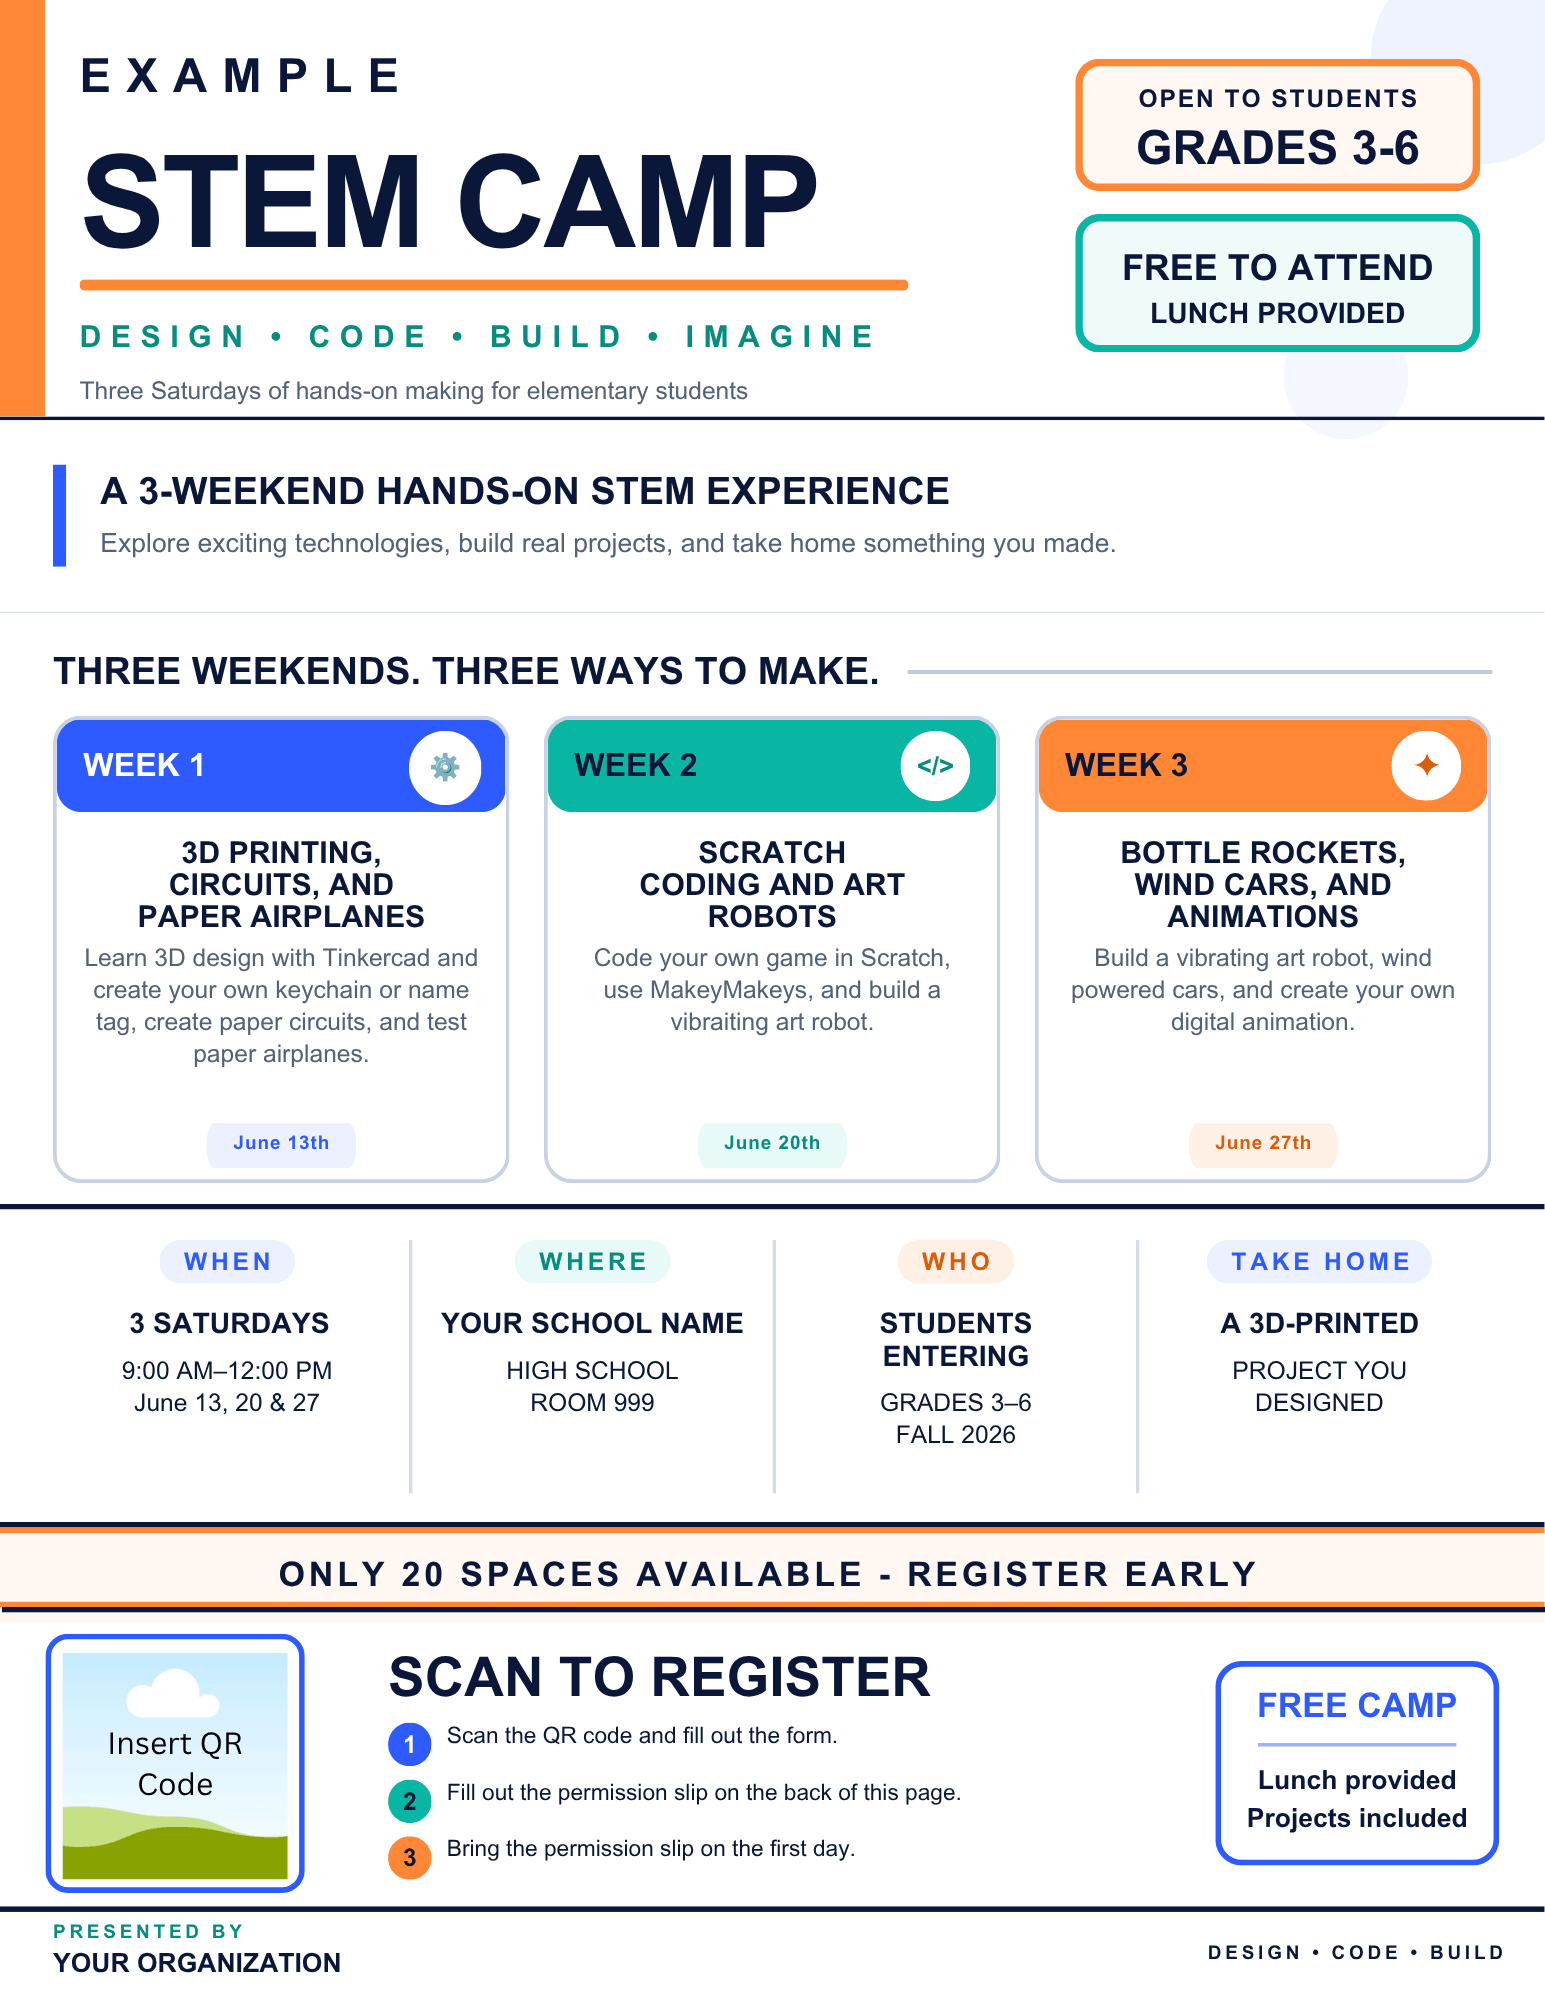
A print-friendly example flyer showing the information families need before registering. Replace every placeholder and confirm the QR code before distributing your version.
- Example camp flyer PDF: Download
- Editable Canva flyer: Open in Canva
Monitor and Close Registration
We enrolled students on a first-come, first-served basis. After advertising begins, check the form regularly and turn on notifications for new responses when possible. Verify that family email addresses are complete and readable, watch the response limit, and answer questions from families. Use the response timestamps to preserve the order in which students registered.
When the camp fills or the registration deadline passes:
- Stop accepting responses and replace the form’s confirmation text with a clear closed message.
- Review the response sheet for duplicate or incomplete registrations.
- Accept students in registration order until the approved capacity is reached.
- Place any extra students on a waiting list in registration order in case an enrolled family cancels.
- Finalize the enrollment status, permission-slip, attendance, lunch, dietary, and sign-out columns in the response spreadsheet.
Then send each family an acceptance, waiting-list, or capacity message.
Enroll Students and Contact Families
Once registration closes, use the response timestamps to enroll students in order until the camp reaches capacity. Mark each student as accepted or waitlisted in the spreadsheet, then send every family a clear status message.
The confirmation should include:
- Student name and enrollment status
- Camp dates and daily schedule
- School name, room number, and address
- Drop-off and pickup windows
- Entrance and hallway directions
- What the student should bring
- Lunch plan
- Permission-slip instructions
- Contact information for questions or cancellations
Ask families to notify the organizers if the student can no longer attend so a student on the waiting list can be invited.
Example Acceptance Email
Subject: STEM Camp Registration Accepted
Hello,
We are happy to confirm that your student has a place in the upcoming STEM camp.
Camp Details:
- Date: [Camp date]
- Time: [Start time] to [End time]
- Drop-off: [Drop-off time]
- Pickup: [Pickup deadline]
- Location: [School name and room]
- Address: [Camp address]
Please reply if your student can no longer attend so we can offer the space to another family. Additional arrival instructions, permission-slip information, and reminders will be sent before the camp.
We look forward to welcoming your student!
Thank you,
[Camp name] Team
Example Capacity Rejection Email
Subject: STEM Camp Registration Update
Hello,
Thank you for your interest in the upcoming STEM camp. Unfortunately, we are unable to enroll your student because the camp has reached its capacity.
[Optional: Your student has been added to the waiting list. We will contact you if a space becomes available.]
We appreciate your interest and hope to offer additional opportunities in the future.
Thank you,
[Camp name] Team
Finalize Supplies and Lunch
After enrollment is confirmed, use the final student count to purchase and organize the materials listed on each activity page. Prepare supplies by student or group as needed, test reusable equipment, print activity sheets, and buy a reasonable number of replacements for damaged or defective parts. Avoid ordering for the maximum form capacity if fewer students are actually enrolled.
We found that providing lunch helped increase signups and made the camp more enjoyable for students. Keep the meal simple. We served Costco pizza and juice boxes because they were relatively inexpensive, familiar to students, and easy to purchase in a large quantity.
Decide who will obtain and bring the food before camp day. This could be one of the student hosts’ parents, the school employee’s spouse or partner, or another reliable adult. Give that person the pickup time, order details, school address, entrance instructions, and a phone number for the on-site organizer.
Use the registration form to collect allergies, dietary restrictions, and general lunch preferences. Confirm pizza preference and dietary needs again during check-in, then give the final counts to the person purchasing the food.
Plan for the food to arrive around 11:45 AM, or approximately 15 minutes before lunch. Also prepare:
- Plates and napkins
- Juice boxes and water
- A separate option for students whose dietary needs are not met by the main order
- A clean serving area
- Trash and recycling bags
- Adults or helpers to distribute food
- A plan for leftovers
- A confirmed location for removing food waste after lunch
Food should not be offered as allergy-safe unless the organizers have verified the ingredients and handling with the family. Follow school rules for outside food and student allergies.
Prepare Directional Signs
Before students arrive, place signs around the host site that clearly direct families from the designated entrance to the camp room. Check the entire path as if you have never visited the school before.
The signs must match the directions in the reminder email. If the email tells families to enter through the front doors and turn right, the first visible sign should direct them right. Do not change the entrance or route without notifying families.
Place signs at:
- The correct parking or drop-off area
- The building entrance
- Every hallway turn
- Stairs or elevators if needed
- The camp-room door
- The check-in and sign-out table
Example Directional Sign Downloads
Send the Final Reminder
Send a reminder email to parents and guardians at least two days before the first session, after the entrance route, room, schedule, lunch plan, and permission-slip process are final. Use the same entrance and hallway directions that will appear on the signs at the camp site.
Example Reminder Email
Subject: Reminder: [Camp name] First Session - [Camp date]
Hello,
This is a reminder that the first session of [Camp name] is this [Day, date].
The camp will be held at [School name] in [Room number]. Enter through [designated entrance], then [hallway directions]. There will also be signage to help direct students.
Students will need to bring their signed permission slip. If the permission slip has been lost, a parent or guardian can fill one out during drop-off.
Camp Details:
- Date: [Camp date]
- Time: [Start time] to [End time]
- Drop-off: [Earliest drop-off time]
- Pickup: [Pickup deadline]
- Location: [School name and room]
- Address: [Camp address]
- What to Bring: Signed permission slip and water, if students would like it
We are excited to welcome everyone for our first session and look forward to a fun morning of STEM activities!
Thank you,
[Camp name] Team
Before sending, update every date, time, room, address, entrance instruction, and contact detail for the current camp. Send the emails using a method that does not expose other recipients’ email addresses, such as BCC or an approved school mailing tool.
Set Up the Site on Camp Day
Before families arrive, unlock and inspect the approved entrance, walk the full route to the camp room, place the directional signs, turn on the room’s temperature control, and confirm that restrooms are accessible. Set out activity supplies, test the computers and projector, and prepare trash/recycling bins.
Set Up Check-In
Set up a table outside the camp-room door before families arrive. Have student helpers sit at the table with:
- Prepared student name tags
- Blank name tags and markers
- Printed permission slips and pens
- The registration response spreadsheet
- A Google Sheet attendance column with checkboxes
- Parent or guardian contact information
- Lunch preference and dietary restriction columns
As each student arrives:
- Find the student in the spreadsheet.
- Check the attendance box.
- Collect the signed permission slip or have a parent or guardian complete one.
- Give the student a name tag.
- Confirm the student’s pizza preference.
- Confirm any allergy or dietary restriction with the parent or guardian.
- Direct the student into the camp room.
Give the final lunch counts and dietary notes to the person bringing the food as soon as check-in is complete. Protect the spreadsheet and do not leave family contact or medical information visible to visitors.
Keep one helper at the table for late arrivals while another organizer begins the camp.
Prepare for Lunch and Sign-Out
When students leave the activity area for lunch, immediately send the designated student helpers back to the table outside the camp-room door. Families may arrive early, so the sign-out station should be ready before lunch begins.
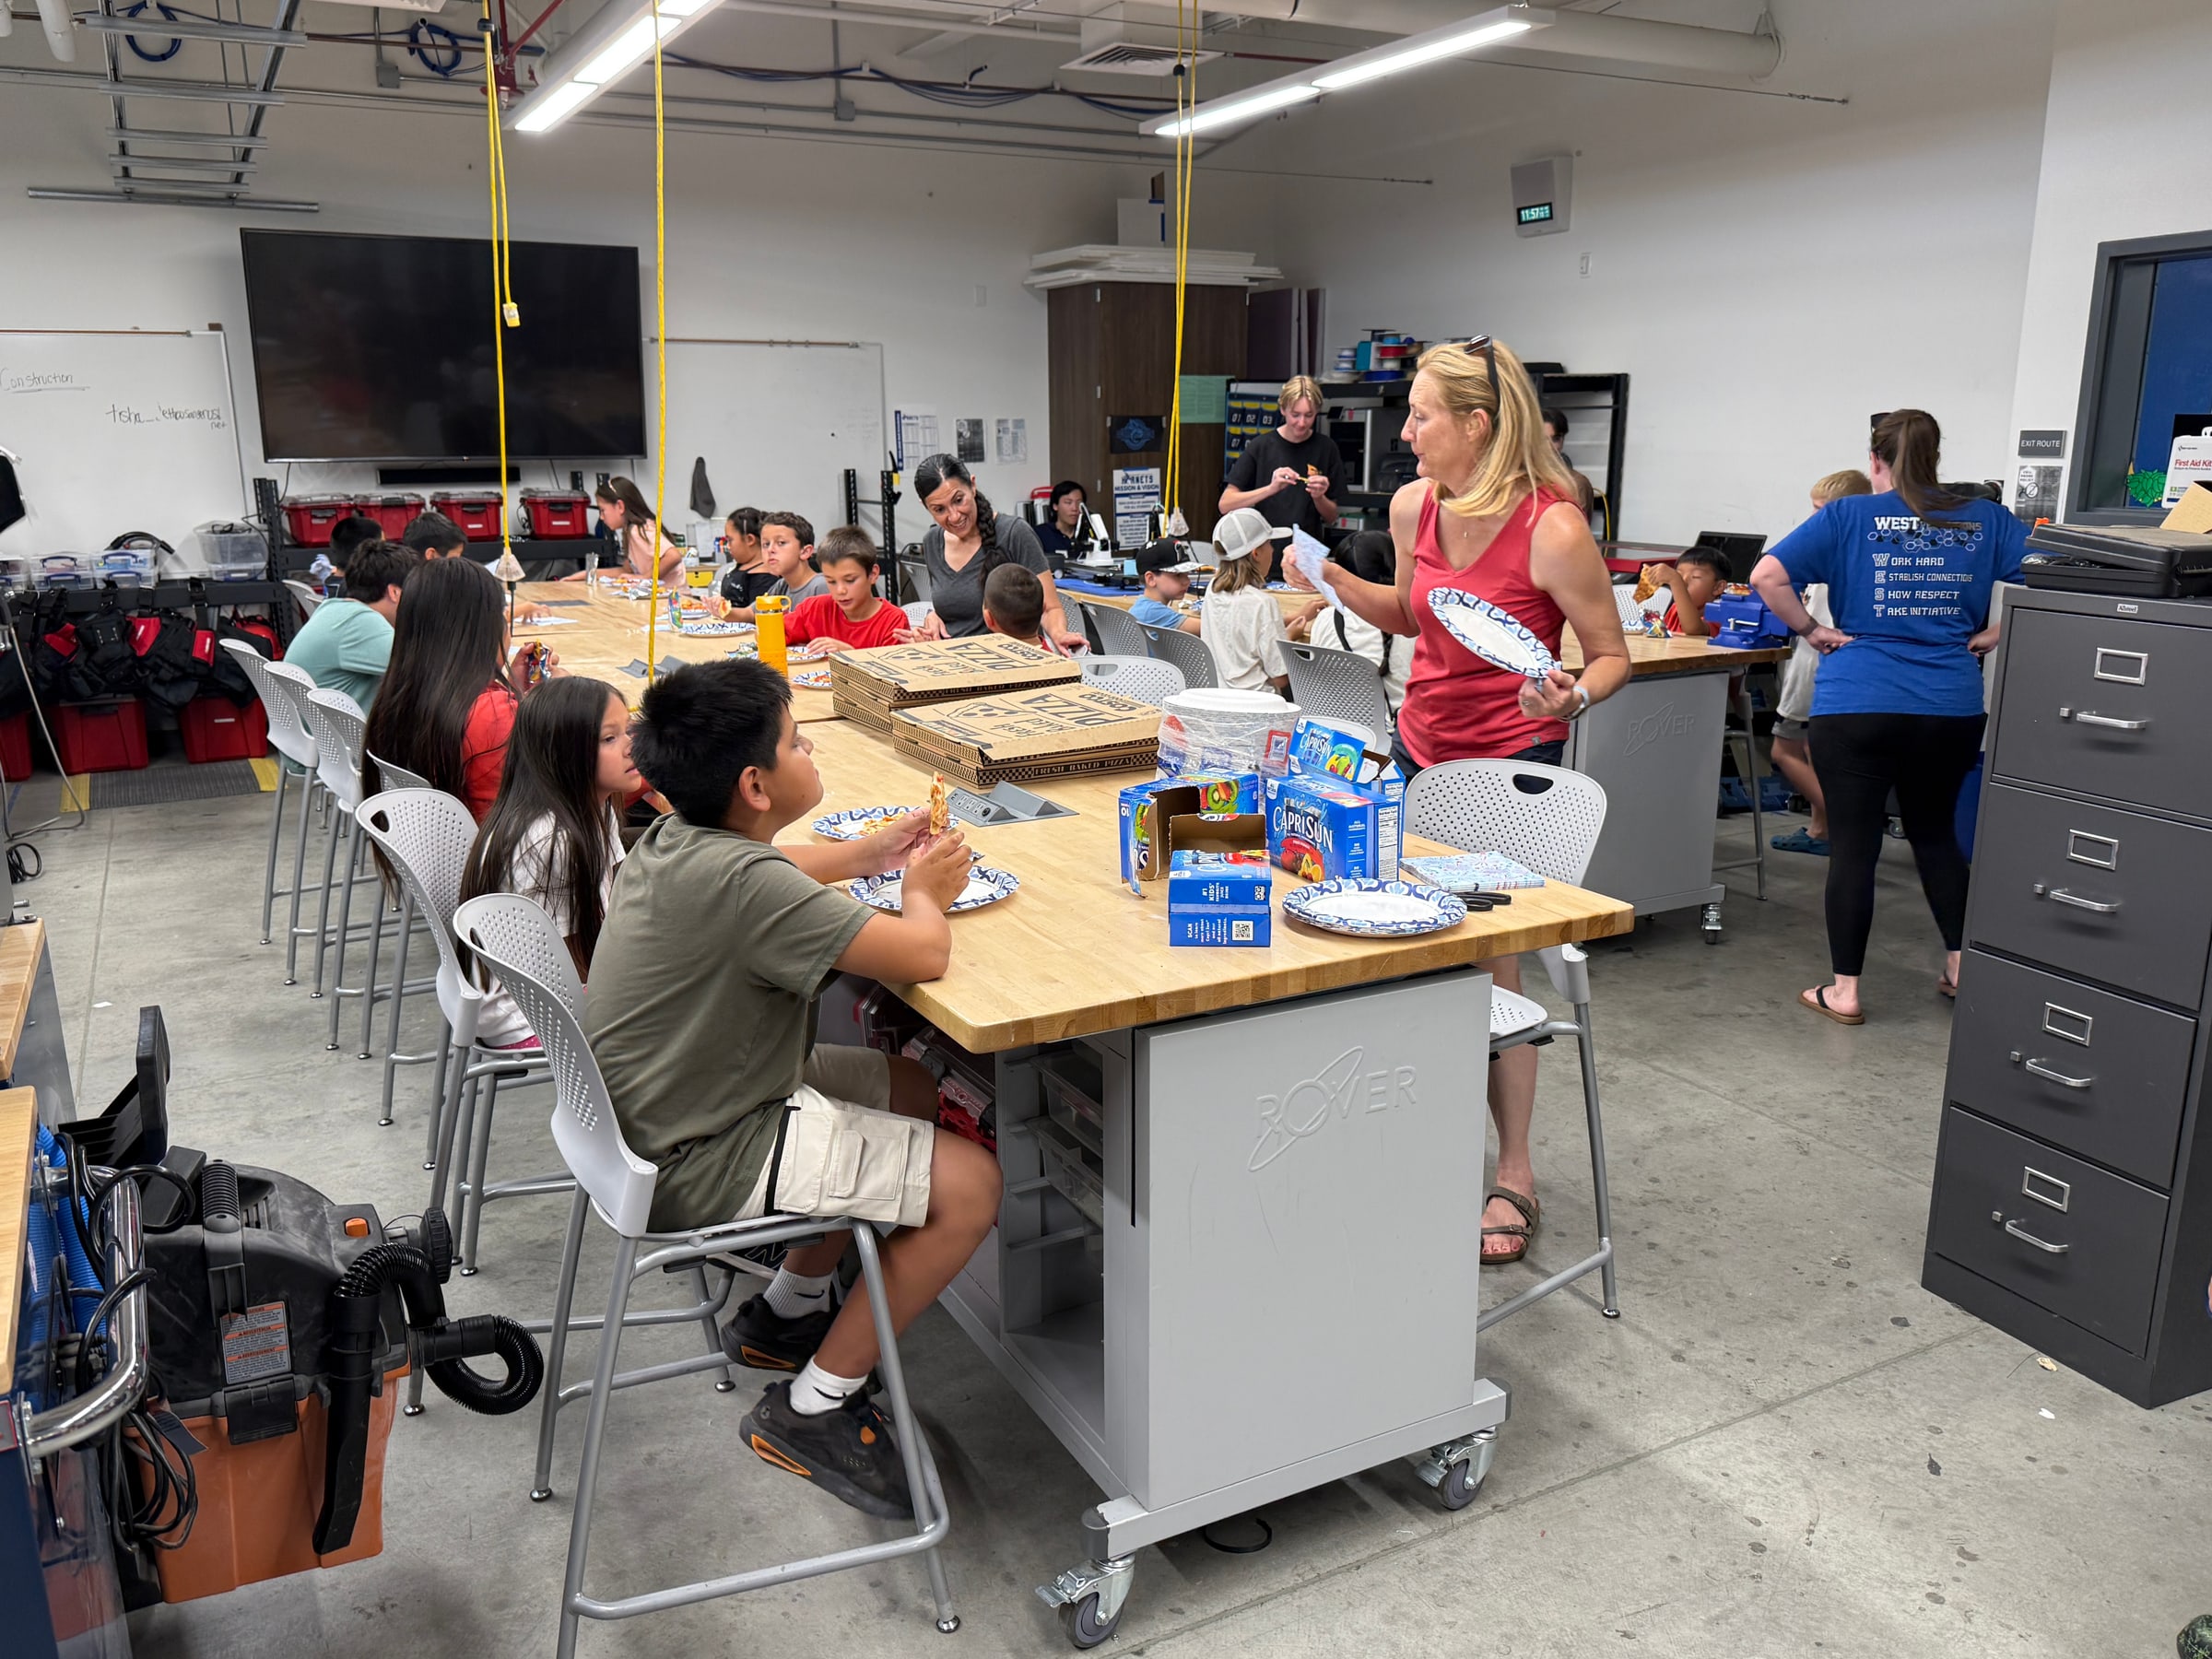
Students eat a simple pizza lunch while the sign-out table is staffed for arriving parents and guardians.
The table should have:
- The attendance and sign-out spreadsheet
- A sign-out checkbox or time column
- The authorized pickup information
- A way to contact the adult host
Only release a student according to the school’s approved pickup procedure. Record each sign-out and keep at least one adult informed about which students remain.
Do not close the camp room or remove the directional signs until every student has been picked up. The student host and school employee should remain on site until the final student leaves.
Final Planning Checklist
Well Before Advertising
- Confirm the school employee who will co-host.
- Receive school or district approval.
- Reserve the room, hallway, and grassy outdoor area.
- Confirm dates, times, capacity, equipment, and building access.
- Confirm that temperature control will operate during every camp session.
- Confirm summer trash and recycling collection or arrange removal.
- Test computers, internet, projection, and activity equipment.
Before Registration Opens
- Create and test the signup form.
- Set the response limit and closure date.
- Link the form to a response spreadsheet and prepare its tracking columns.
- Confirm the family contact method.
- Finish the flyer and registration link or QR code.
- Plan how permission slips will be distributed and collected.
While Registration Is Open
- Advertise through approved school and community channels.
- Check responses and contact information regularly.
- Watch the capacity limit and answer family questions.
- Close the form when it reaches capacity or the deadline passes.
After Registration Closes
- Confirm enrollment and create a waiting list.
- Send one acceptance, waiting-list, or capacity message to each family.
- Purchase and organize activity materials using the final enrollment count.
- Finalize the lunch plan, name tags, and attendance sheet.
At Least Two Days Before Camp
- Send the reminder email.
- Confirm the food pickup person and order.
- Confirm the adult host, student helpers, and activity assignments.
- Recheck the building entrance, room number, and family directions.
- Print permission slips and directional signs.
On Camp Day
- Unlock and inspect the approved entrance and rooms.
- Post signs that match the reminder email.
- Set up the check-in table outside the camp door.
- Confirm attendance, permission slips, and lunch needs.
- Send final food counts to the pickup person.
- Have lunch arrive about 15 minutes before it is served.
- Remove food waste, trash, and recycling according to the summer plan.
- Restaff the sign-out table as soon as lunch begins.
- Remain until every student has been signed out.