Scratch Apple-Collection Game
In this activity, students create a game where a player moves and jumps to collect apples before time runs out. The completed example includes a score, countdown timer, moving apples, keyboard and on-screen controls, sound, and a game-over sequence.
This project can introduce events, loops, variables, conditionals, sensing, broadcasts, clones, operators, and custom blocks. Students do not need to use every feature for the game to be successful.
By the end of the lesson, each student should have a playable game they can test, improve, and personalize.
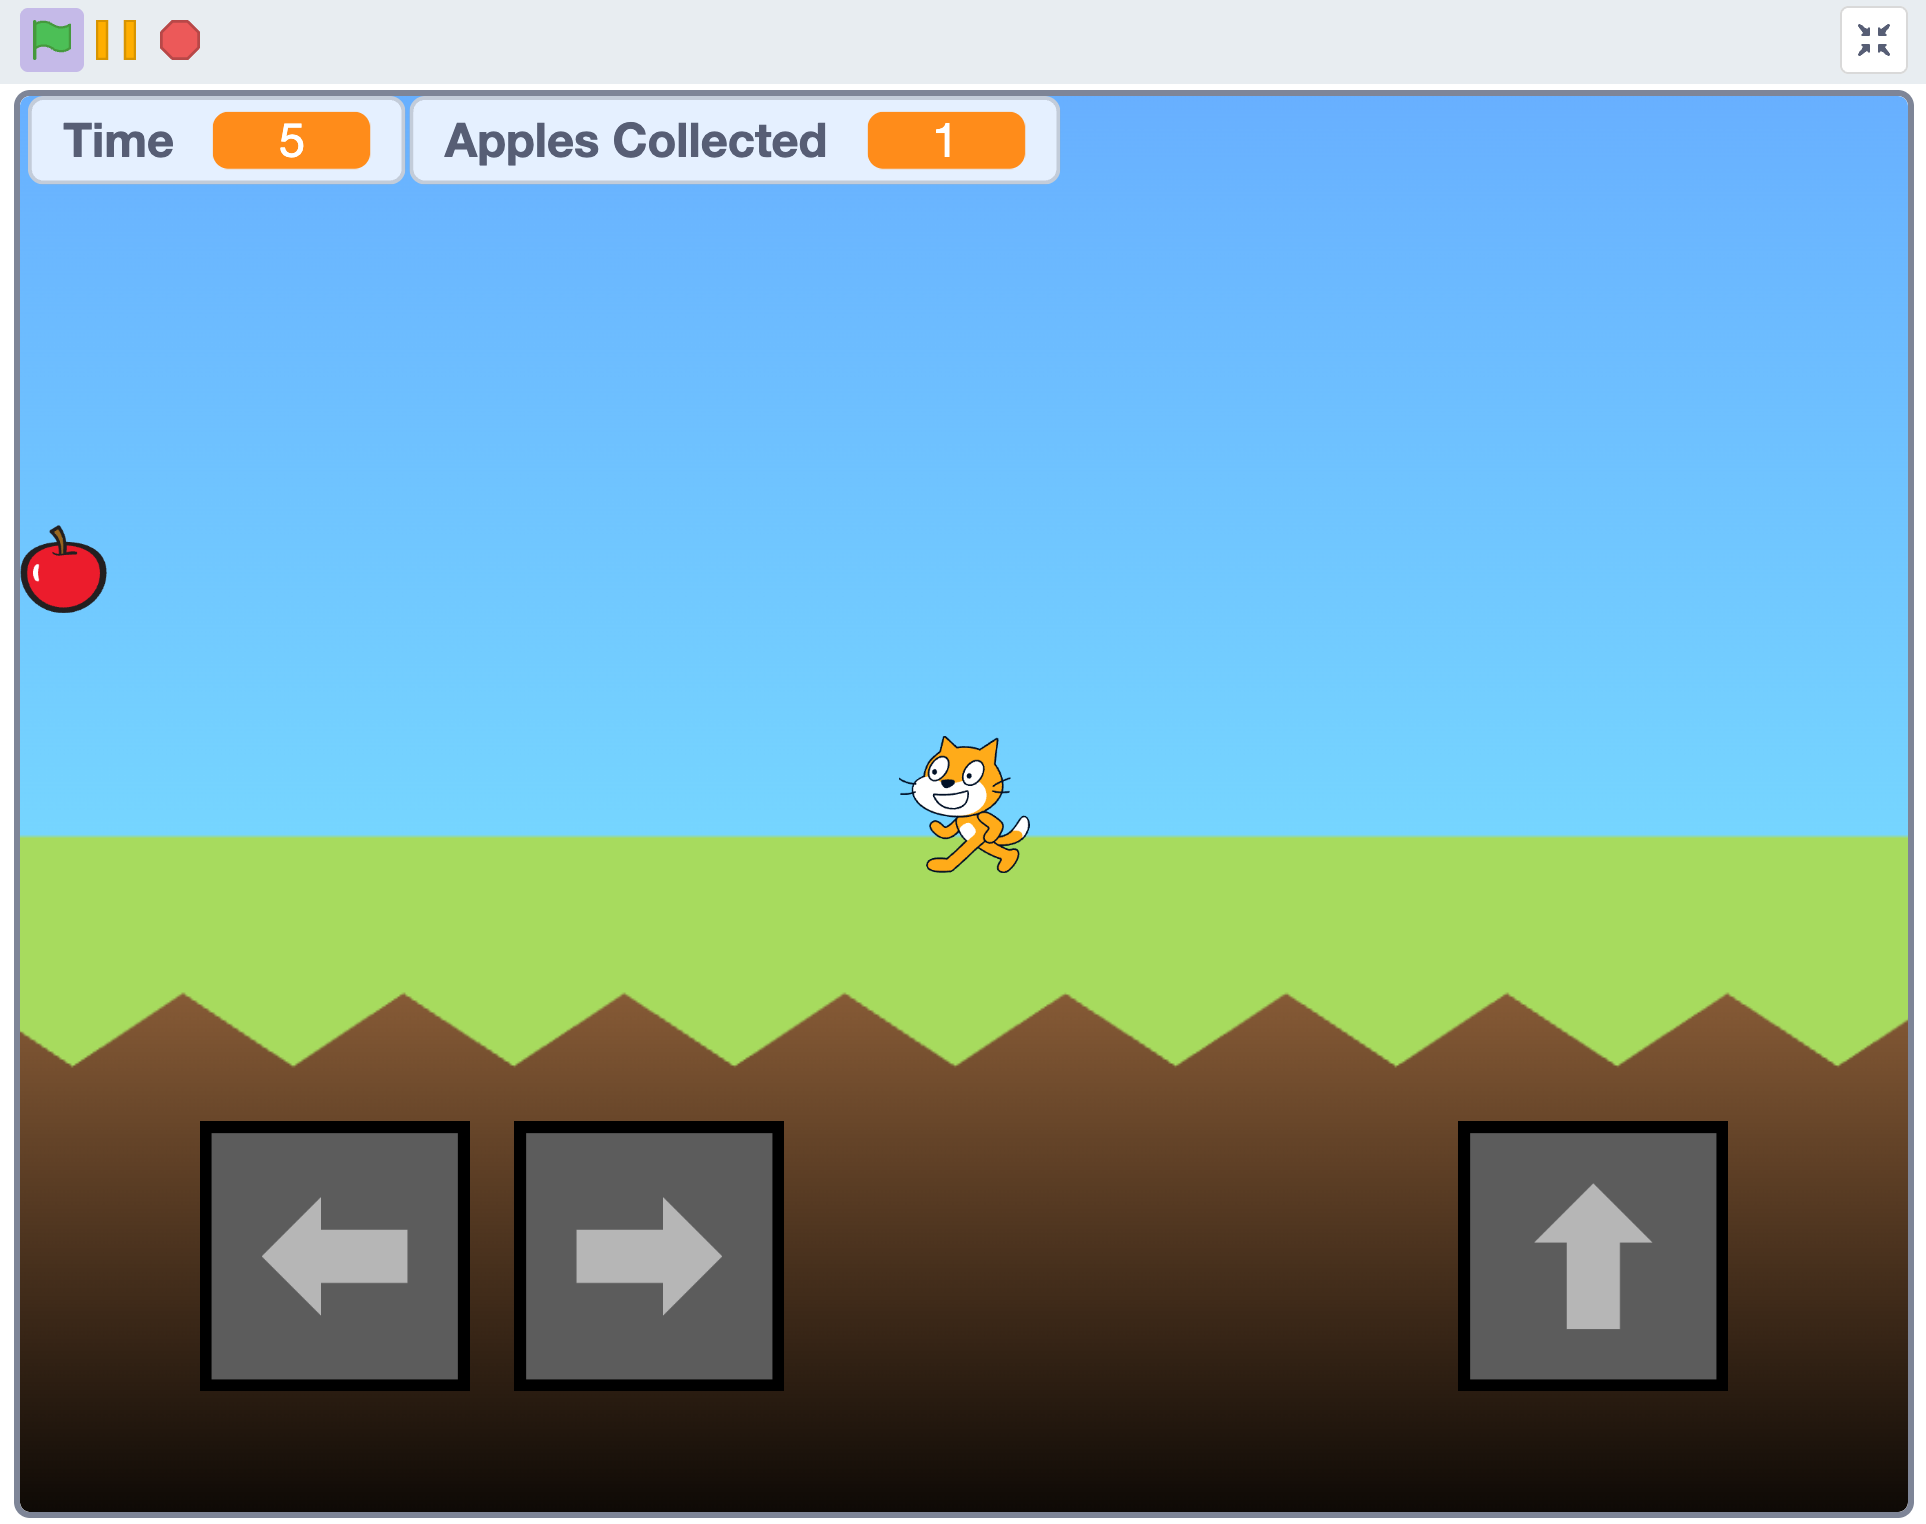
The finished example challenges the player to collect as many apples as possible before time runs out. It supports keyboard input and on-screen controls.
Open the completed Video Game Example to play the game or inspect its code.
Adjust the Project to Your Students
Adjust the complexity of the game to match the age, experience, and pace of your students. The completed example is a reference, not a minimum requirement.
For beginners, focus on a player that moves with the keyboard, one apple to collect, and an Apples Collected score. Add the timer, moving apples, jumping, or a game-over screen only if the group is ready.
More experienced students can add apple clones, touch controls, custom blocks, random movement, sound effects, animation, and extra time for collecting an apple. It is better for students to finish a simple game they understand than to copy advanced code they cannot explain.
Materials
For each student
- Computer with internet access
- Access to the Scratch project editor
- A way to play game sounds, with headphones preferred
For the instructor
- A way to project your screen, such as a projector or classroom TV
- One tested example of the game
- A plan for which features are required and which are optional
Before You Begin
Use Scratch Without Student Accounts
We found it best not to create student Scratch accounts before the session. Open the Scratch project editor on every computer and let students complete the lesson without signing in.
During parent pickup, a parent or guardian can help the student create an account and save the game online. If the family does not want to create an account, the student can select File → Save to your computer and email the downloaded .sb3 file to themselves or their parent or guardian.
Prepare the Computers and Example
Confirm that Scratch loads on every computer. Test the keyboard controls, sound, and project-download process before students arrive.
Open and test the completed Video Game Example, then decide how far the class should progress. Beginners may stop after creating movement and scoring, while experienced groups can continue into the advanced systems shown below.
Teaching the Lesson
Begin by playing the example game. Ask students to identify the goal, controls, score, timer, player, and collectible object.
Explain the challenge in one sentence: move the player to collect as many apples as possible before the timer reaches zero.
Build the game in short stages. Demonstrate a small group of blocks, let students reproduce and test that part, then continue. Do not display the entire finished code and expect students to copy it all at once.
Build the Stage and Sprites
Choose a backdrop and add three sprites:
- A player
- An apple
- An optional on-screen controls sprite
Create two variables for all sprites:
Apples CollectedTime
Set Apples Collected to zero when the green flag is clicked. Choose a starting value for Time that gives students enough time to understand and test the game.
Create the Player Controls
Start with keyboard movement. The example accepts either A and D or the left and right arrow keys. Space or the up arrow makes the player jump.
For a beginner version, students can use simple if key pressed blocks inside a forever loop. More advanced students can organize movement and jumping into custom blocks and use variables to track direction, jumping, and vertical movement.
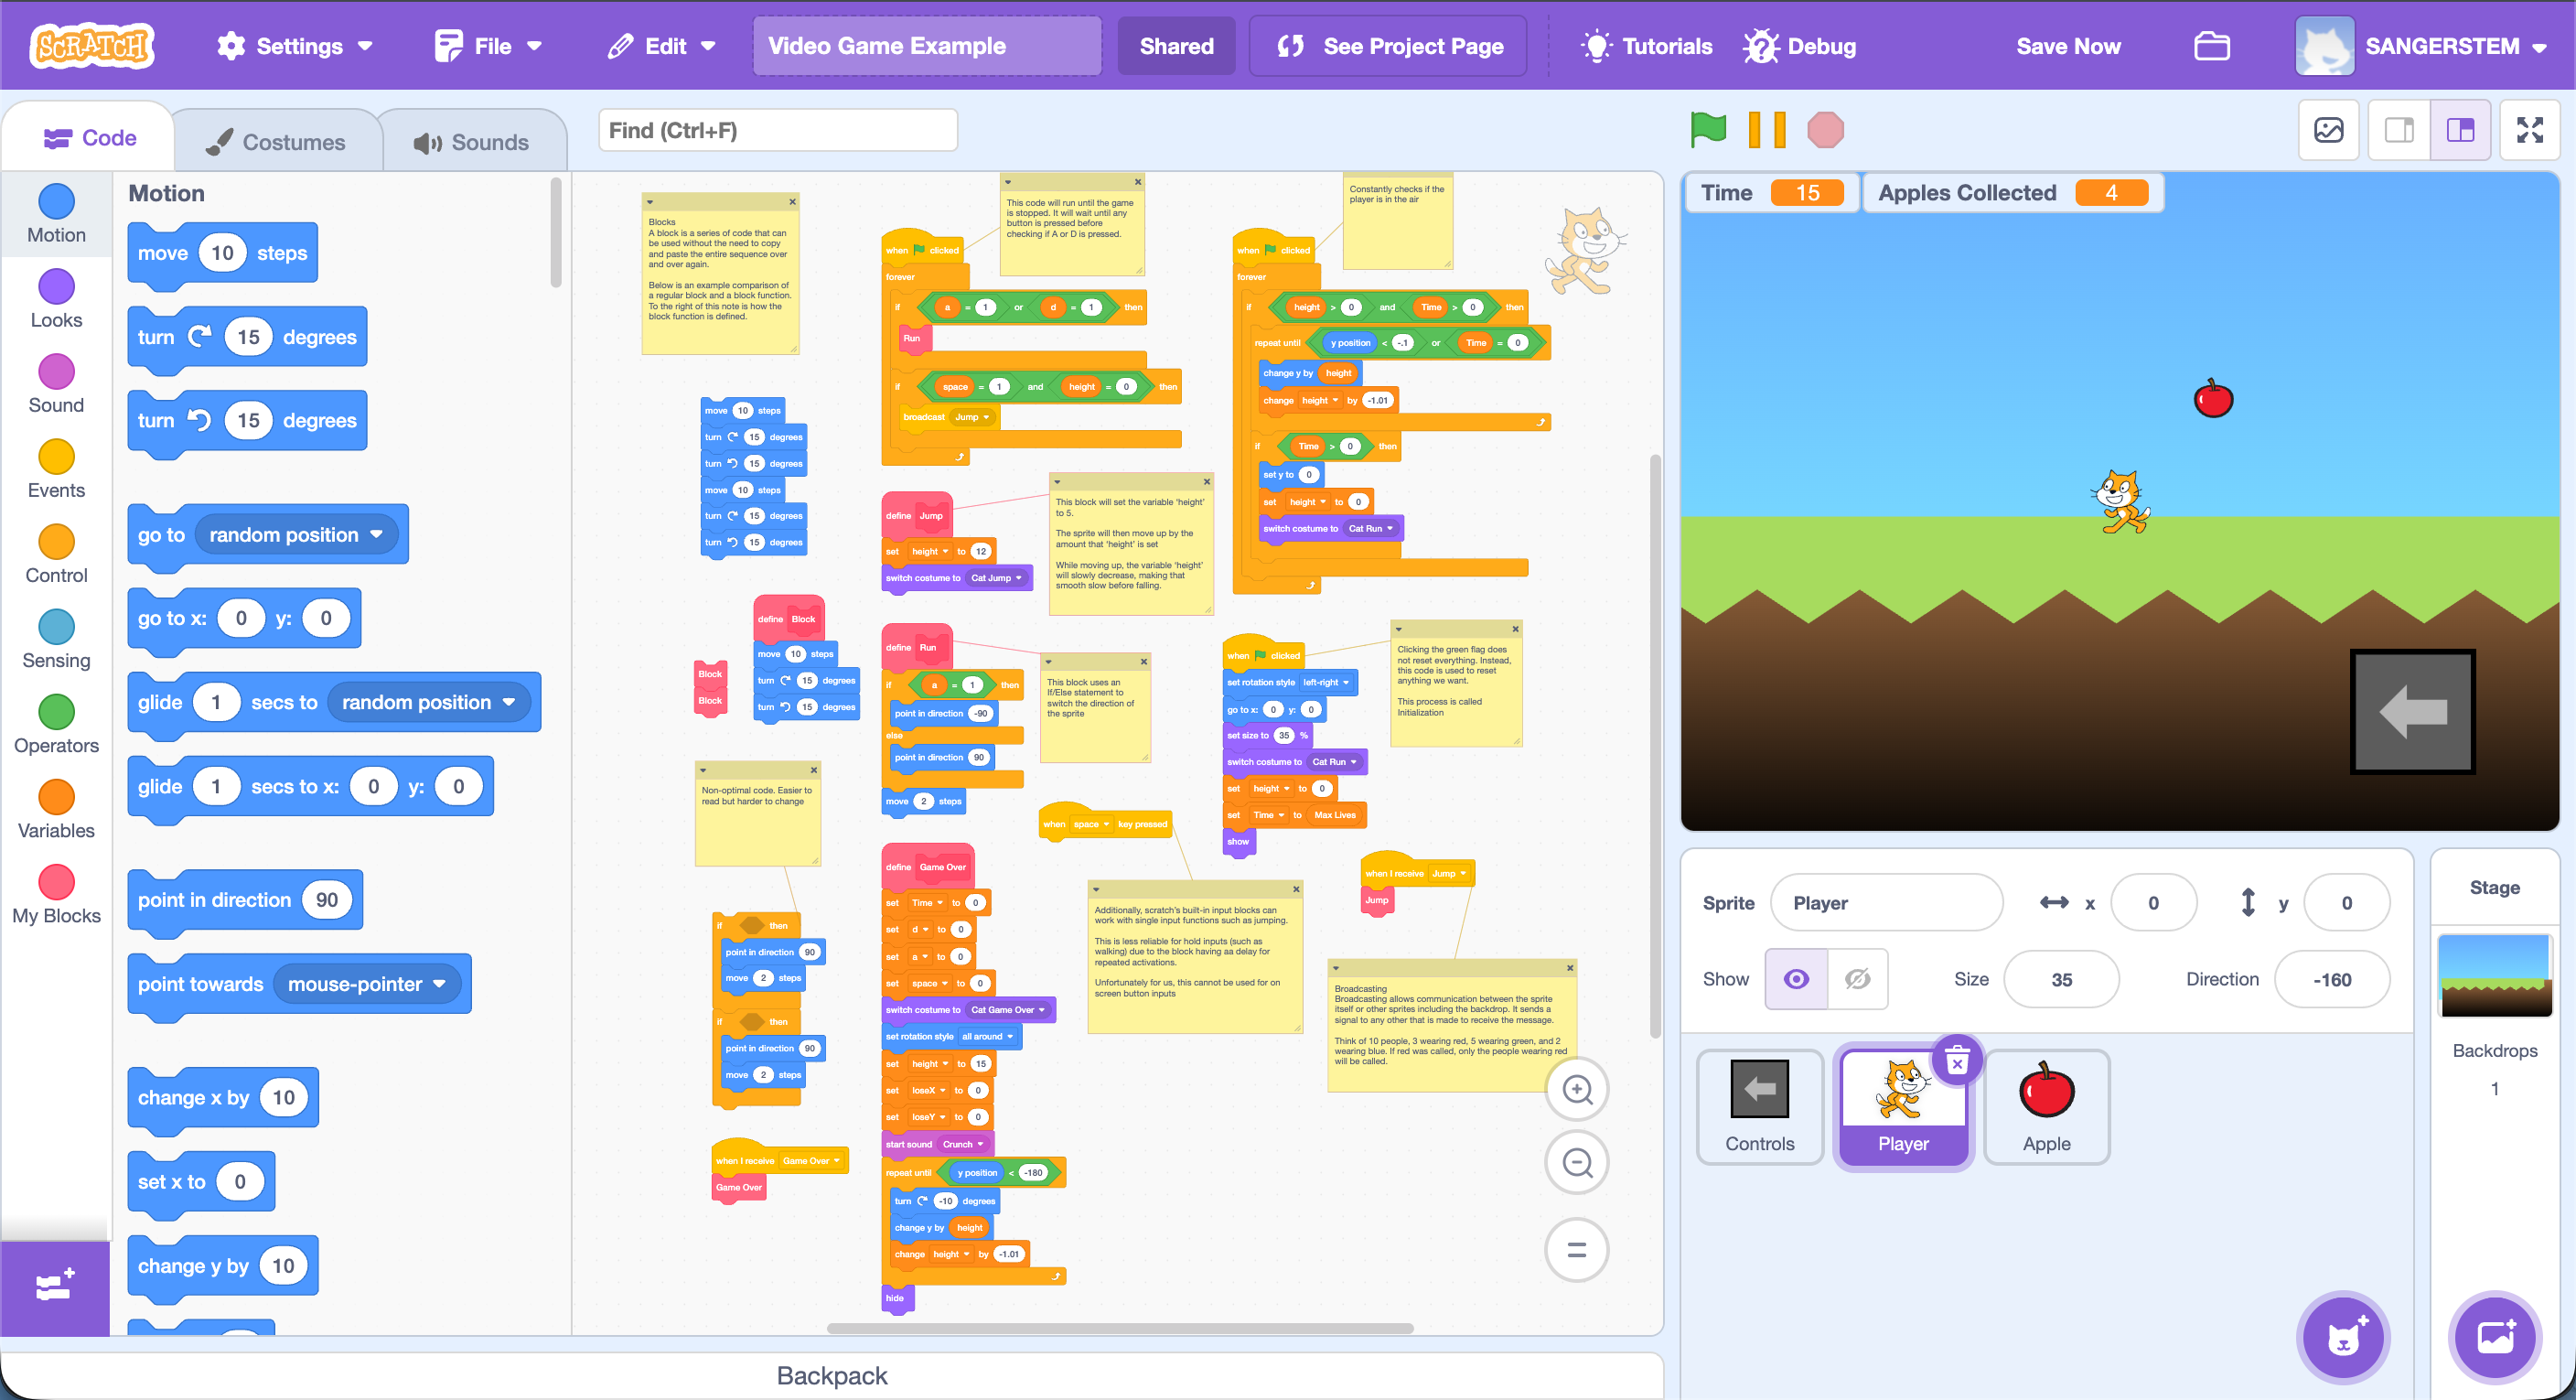
The completed player uses custom blocks for running, jumping, and game over. The height variable creates the upward and downward movement of a jump.
The full example also includes an on-screen controls sprite. It creates left, right, and jump buttons as clones, then detects keyboard presses or mouse clicks. This is optional and should be reserved for groups that are comfortable with the basic keyboard controls.
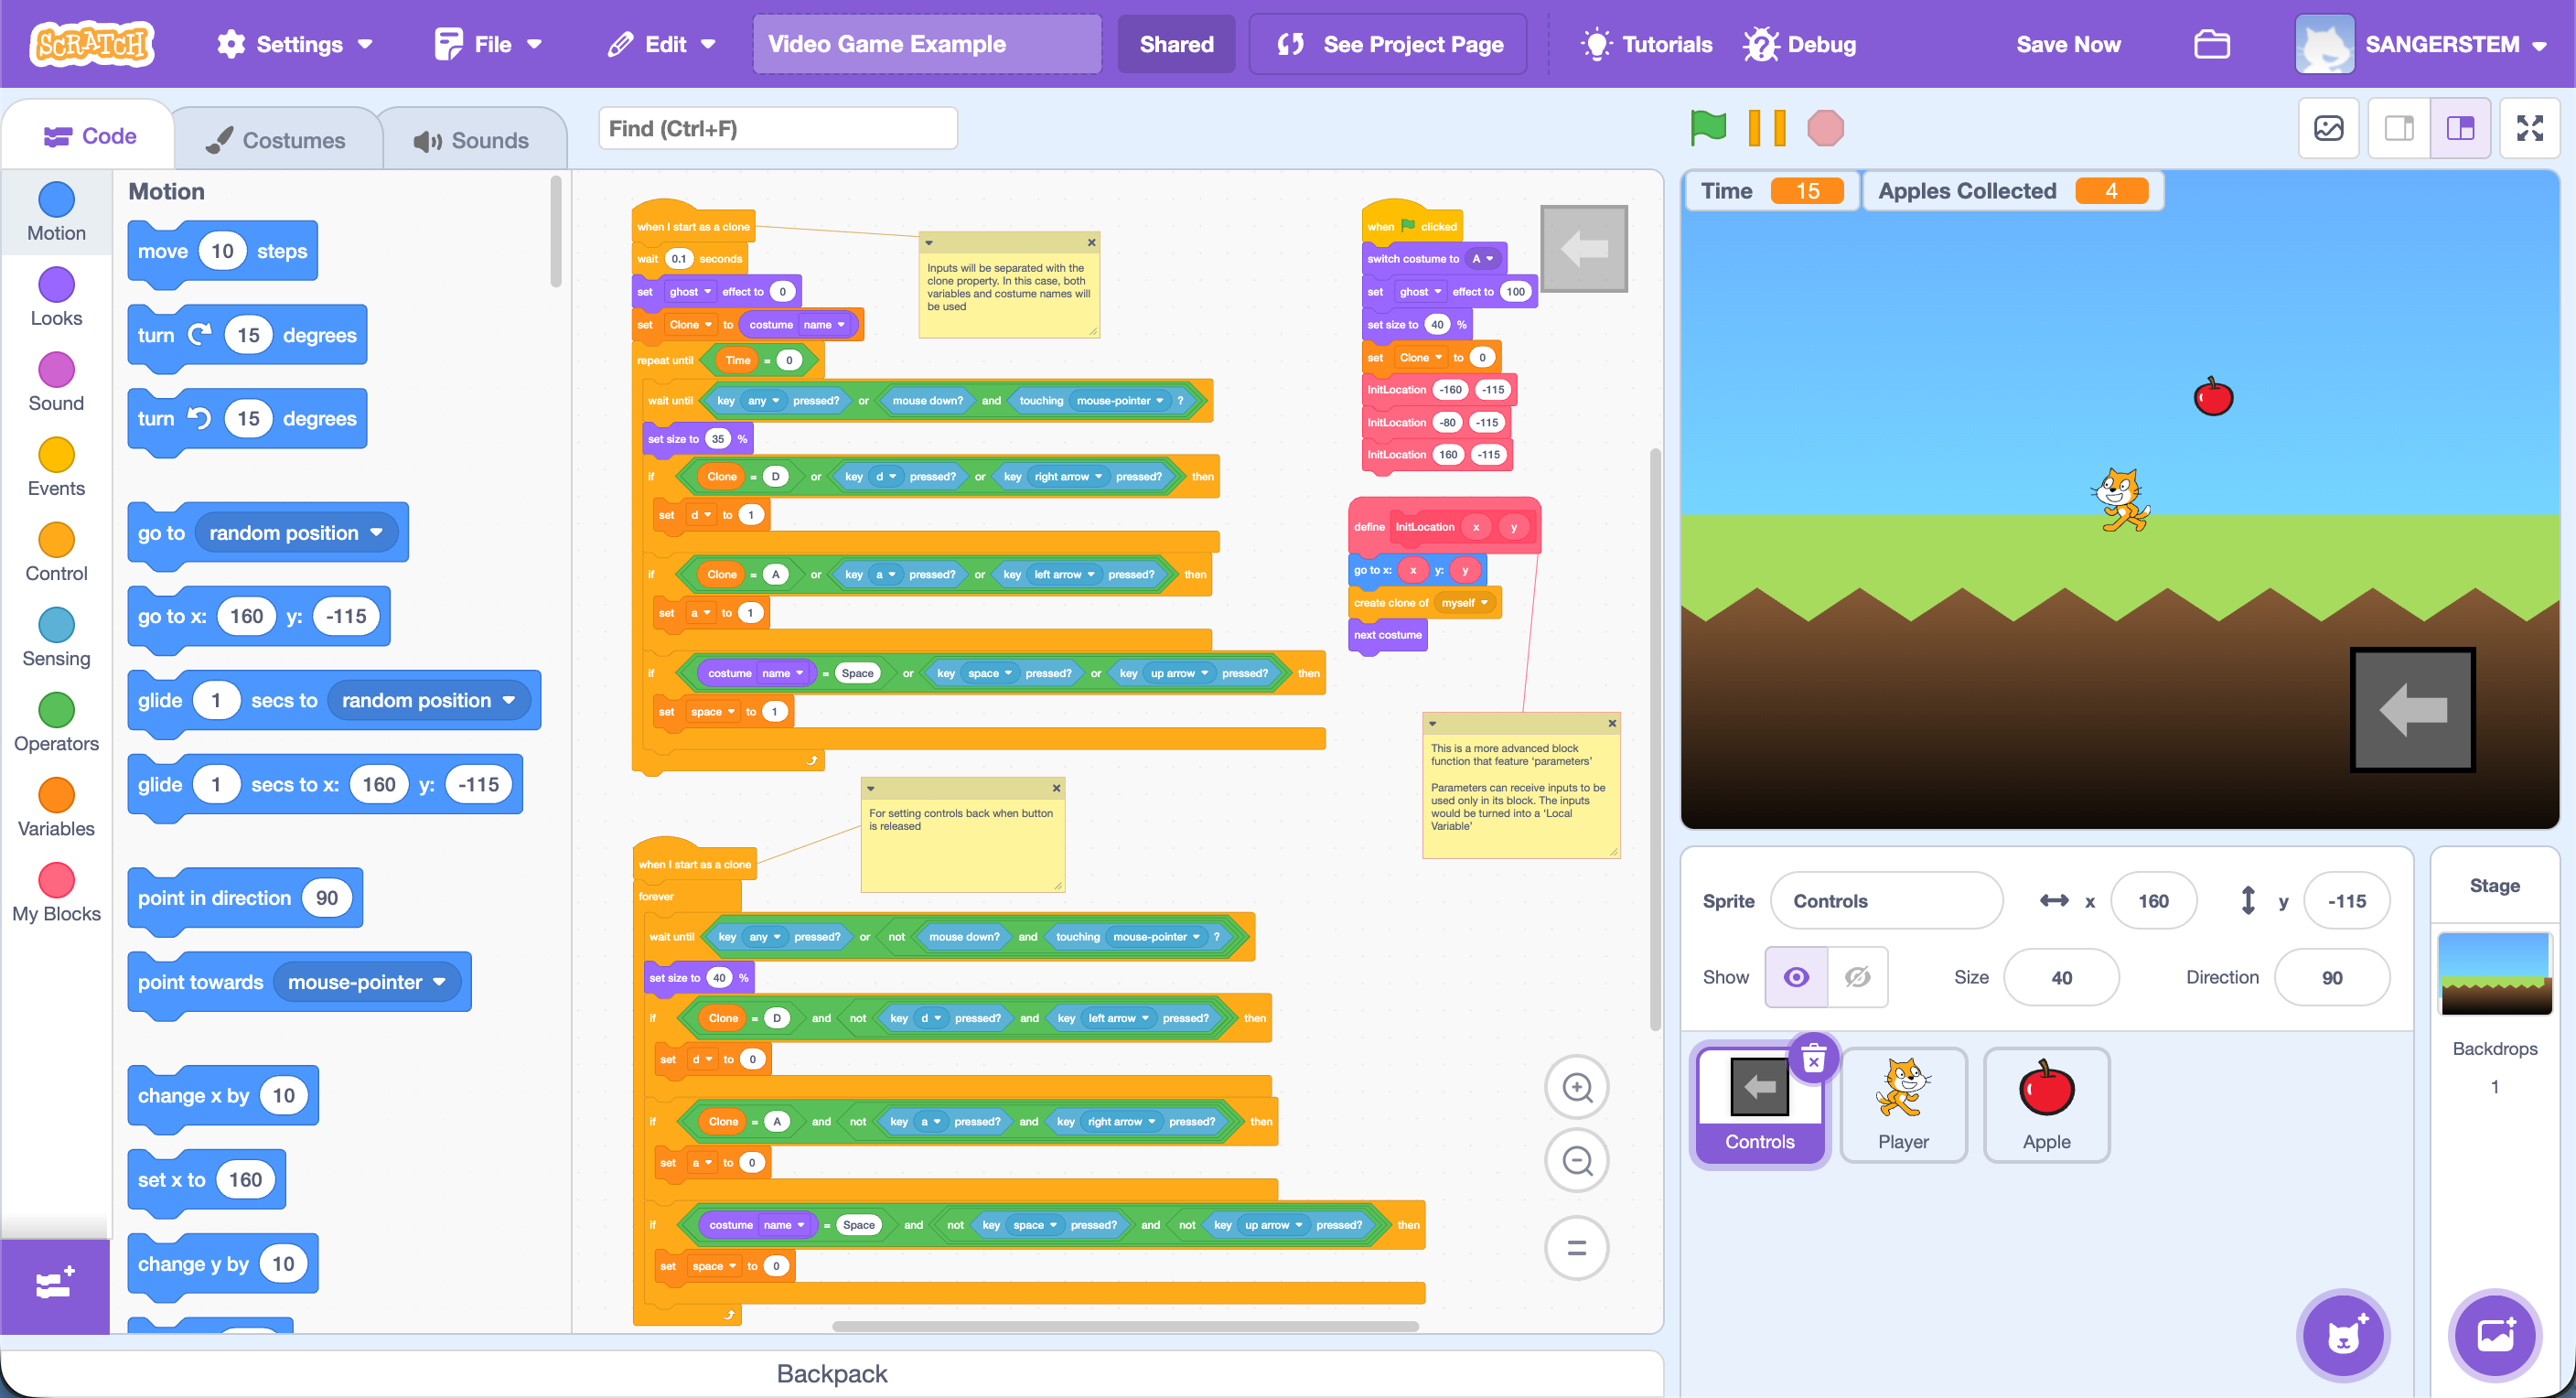
The controls sprite supports A and D, the arrow keys, space, and clickable buttons. Beginners can omit this entire system and use keyboard controls only.
Program the Apple
Begin with one visible apple. When the player touches it:
- Increase
Apples Collectedby one. - Play a collection sound.
- Move the apple to another location.
The completed example uses clones to create and replace apples. Each apple clone moves toward the player until it is collected or time expires. When collected, it adds one point, adds two seconds to the timer, moves upward while fading, creates the next apple, and deletes itself.
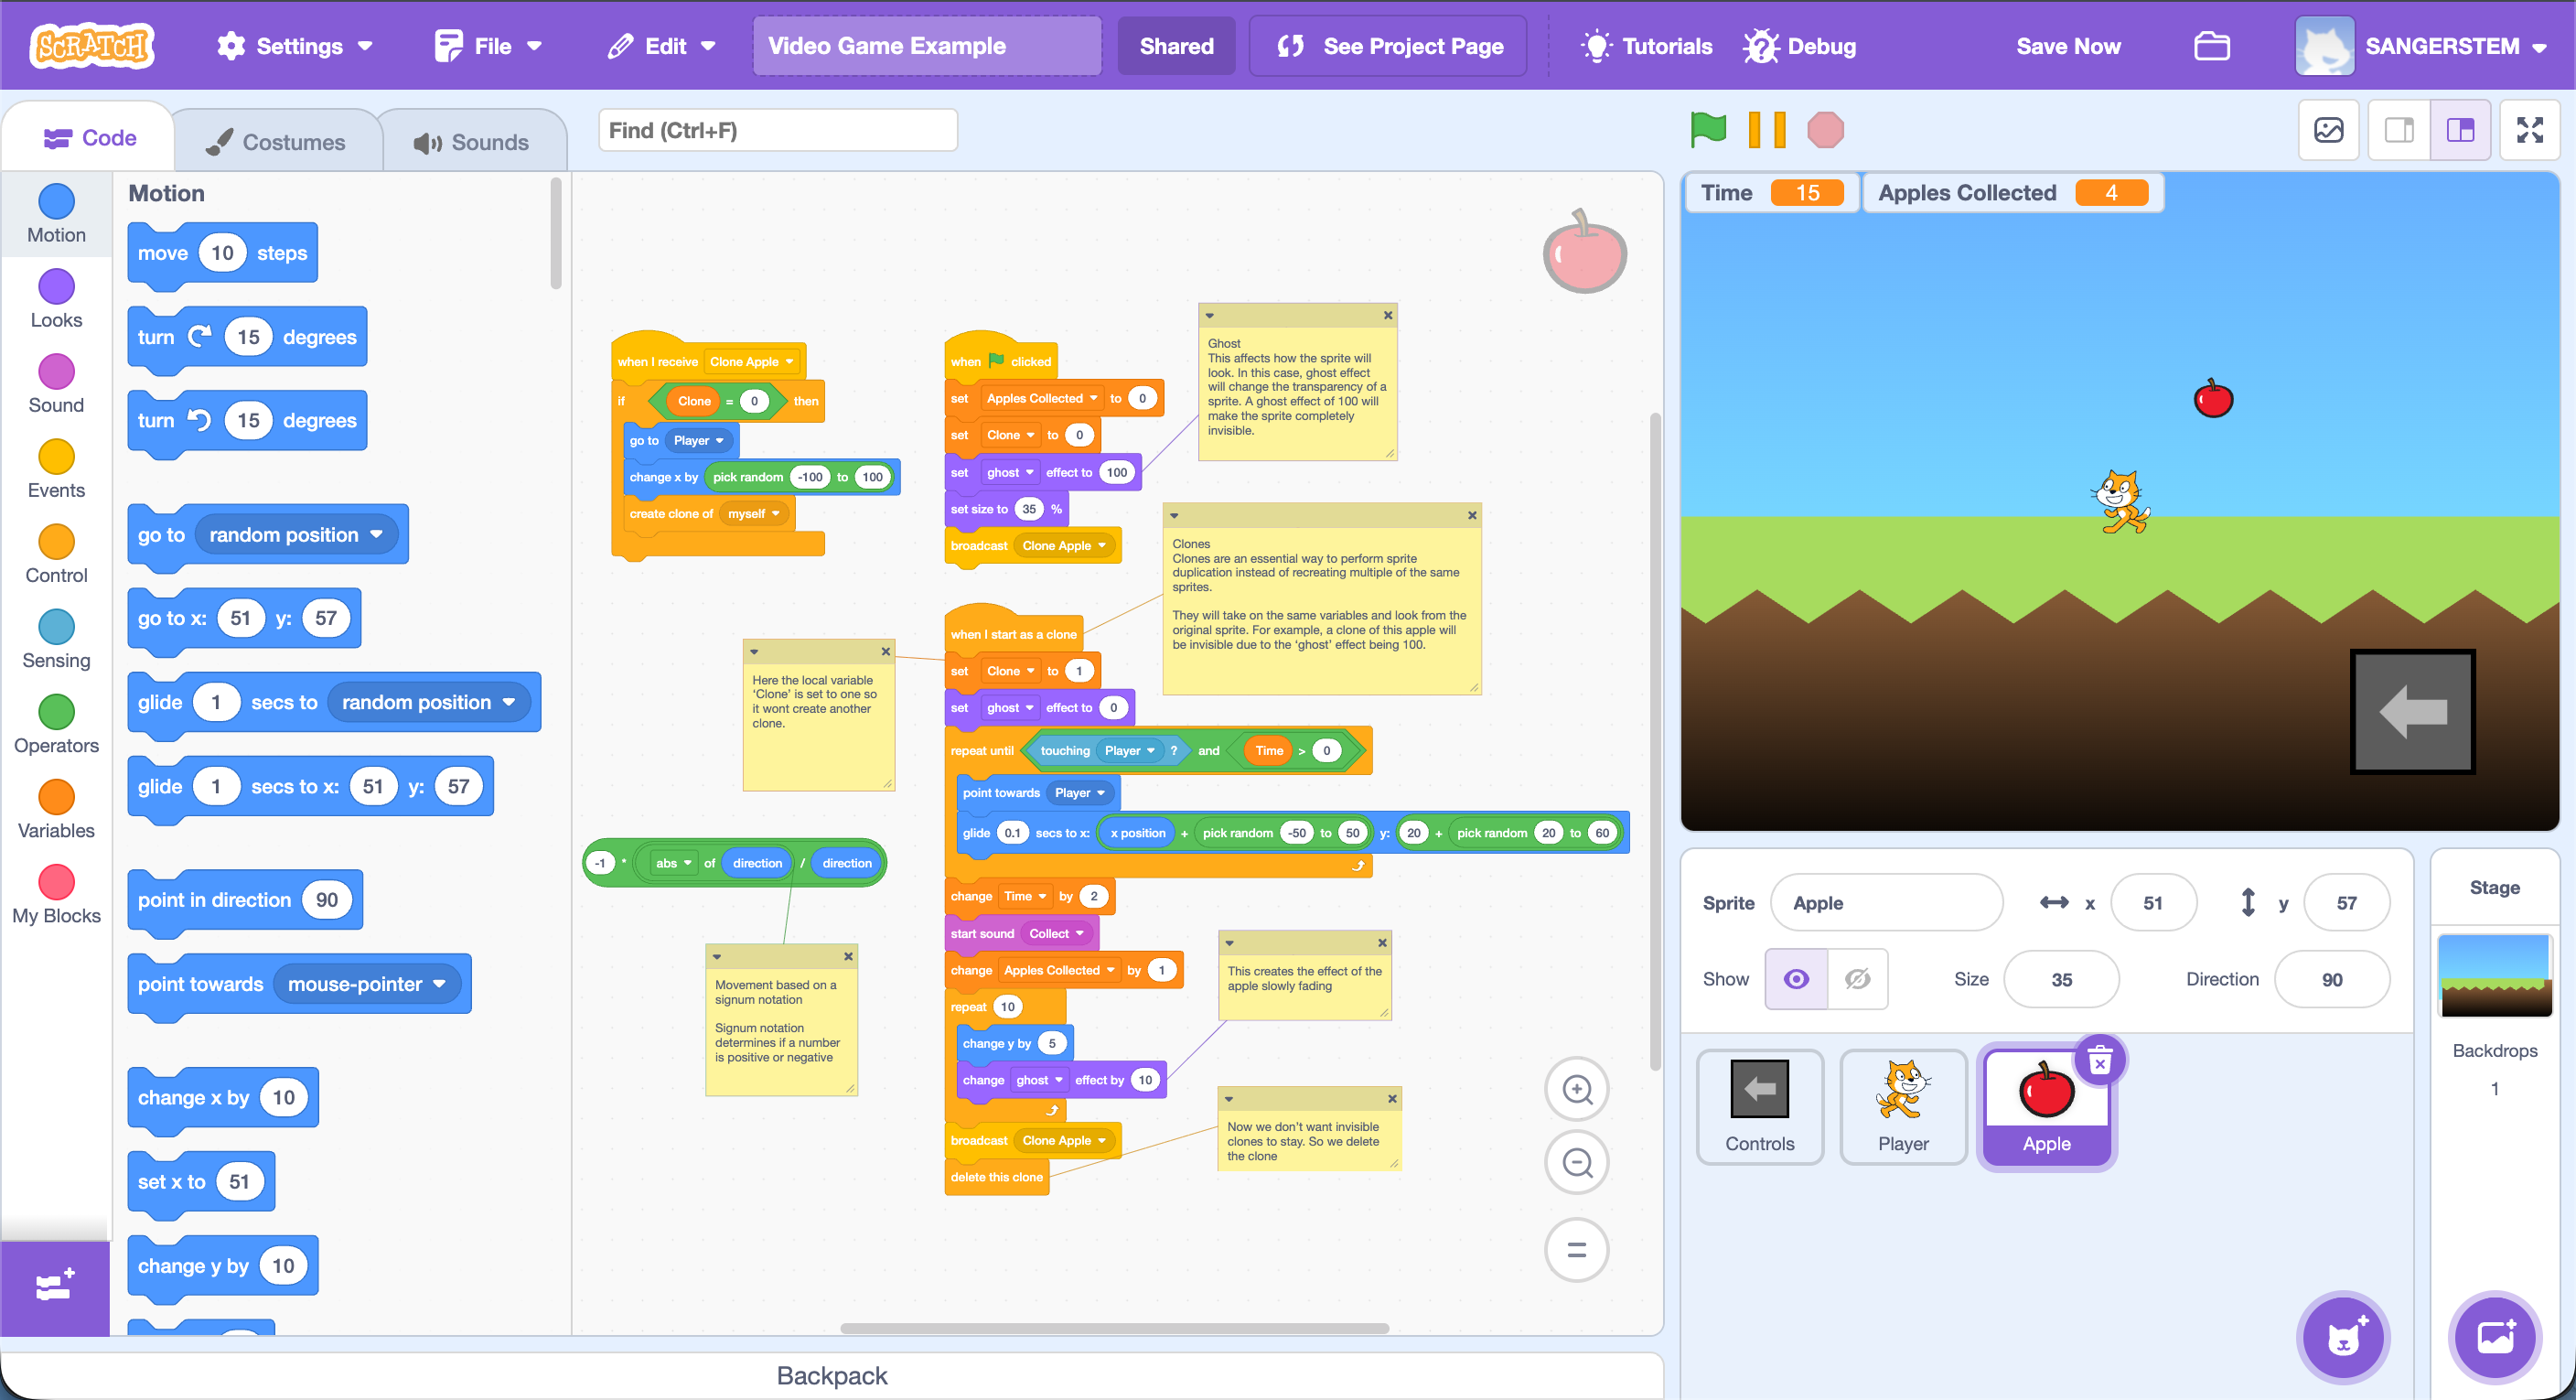
Apple clones move toward the player and use sensing to detect collection. The extra-time reward and fading animation are optional improvements.
Add the Timer and Game Over
On the Stage, set Time to the chosen starting value. Use a loop that waits one second and subtracts one until the value reaches zero. When time runs out, broadcast Game Over so the player, apples, and other scripts can stop or change state.
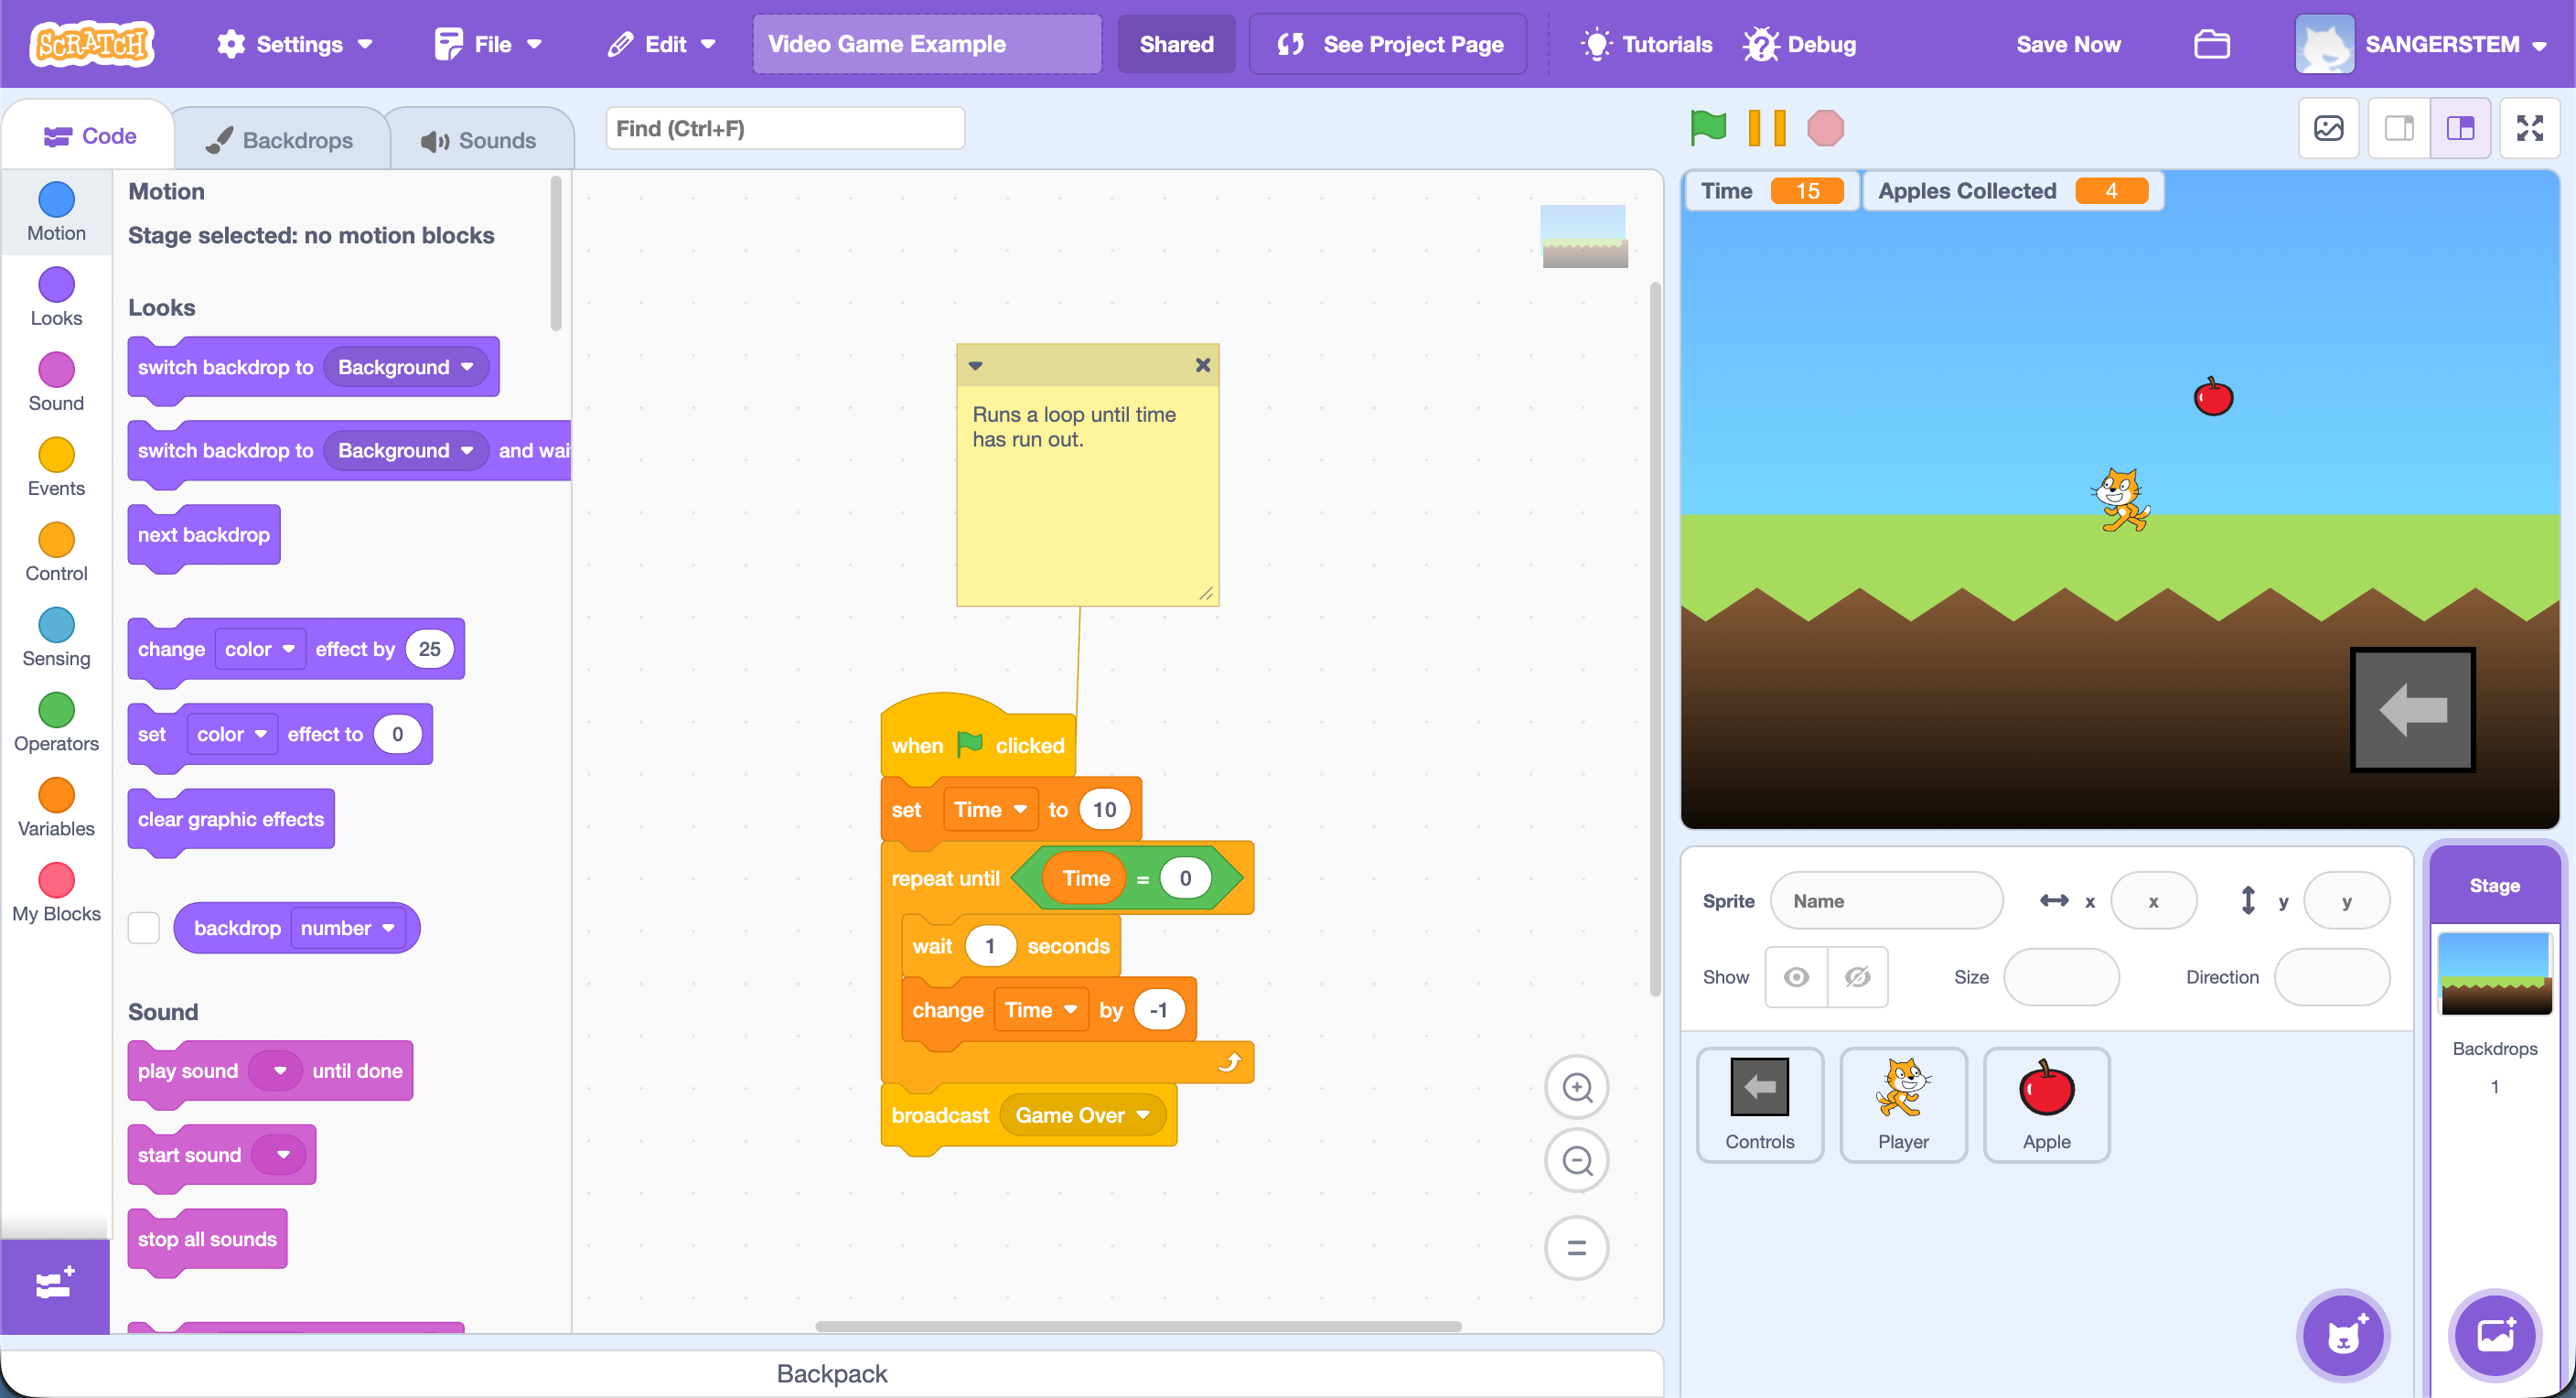
The Stage controls the countdown and broadcasts Game Over when the timer reaches zero.
Understanding the Code
Variables
Apples Collected stores the player’s score, and Time stores the remaining play time. The example uses additional variables for movement, jumping, clones, and controls, but these are optional in a simpler version.
Loops and Conditionals
A forever loop repeatedly checks for player input. If blocks decide whether a key is pressed or whether the player is allowed to jump. A repeat until loop keeps the timer or apple behavior running until a condition is met.
Sensing and Operators
The apple uses a touching Player? sensing block to detect collection. Operator blocks combine conditions, compare values, and select random positions.
Broadcasts and Clones
Broadcasts coordinate parts of the game without placing all code in one script. The example uses Game Over, Jump, and Clone Apple messages.
Clones create temporary copies of a sprite while sharing its scripts and costumes. They are useful for collectibles and controls, but students can build a complete beginner game without them.
Custom Blocks
Custom blocks group related instructions under names such as Run, Jump, Game Over, and InitLocation. They make a large project easier to organize. Introduce them only after students understand the actions inside each block.
Testing and Improving
Have students test after every major feature instead of waiting until the entire game is built.
Ask them to check:
- Does the player begin in the correct location?
- Do the selected keys move the player in the expected direction?
- Can the player jump and return to the ground?
- Does touching an apple increase the score once?
- Does the apple move or reappear after collection?
- Does the timer decrease once per second?
- Does the game stop or change when time reaches zero?
- Can the project restart correctly when the green flag is clicked again?
Once the core game works, students can personalize it by changing the player, collectible object, backdrop, sounds, time limit, speed, reward, or difficulty.
Saving Projects
Have every student give the project a recognizable name before parent pickup.
During pickup, give each family two choices:
- A parent or guardian helps the student create a Scratch account and save the project online.
- The student selects File → Save to your computer, confirms that the
.sb3file downloaded, and emails it to themselves or their parent or guardian.
Resources
Cleanup
- Make sure students have named their projects.
- Confirm that each family has either saved the project to an account or downloaded and emailed the
.sb3file. - Close Scratch or the web browser on every computer.
- Return headphones and other classroom materials.
- Leave computers ready for the next activity.